Terminology
Common terms, jargon, and answers to frequently asked questions related to products and services in the outdoor sports industry
Base – This generally refers to a couple things;
Base (The Base Area) can refer to the bottom of a trail, typically where a lodge exists, or the overall bottom of a mountain/ski area.
Base also refers to the material the bottom of the ski is made of. Base material affects glide over the snow, since this is the largest amount of surface area in contact with the snow on a ski. Base material is usually “sintered,” or “extruded”.
Sintered bases are harder, and absorb wax better, but they are more expensive. Both require wax to be applied regularly for a ski to perform best. Most skis now use extruded black base, since it is less expensive and easier to repair. Sintered bases are typically applied to race or race type skis.
Sintered bases are made by compressing polyethylene pellets together under high pressure. This process makes the base more porous, which helps it absorb wax and resist abrasion. Sintered bases are more expensive and require more maintenance than extruded bases, but they are faster and more durable. Sintered bases are a good choice for competitive skiers, skiers who wax frequently, or skiers who don't do their own repairs.
Extruded bases are made by melting polyethylene pieces (or pellets) together to create sheets. Extruded bases are cheaper, easier to repair, and require less maintenance than sintered bases. Extruded bases are often used on beginner and park boards because they are easy to make and repair.
A note about ski bases and ski performance; Typically, a ski performs best when the base is perfectly flat, with minor beveling of the metal edge on the bottom edge of the ski. To understand more about base flatness, see the definitions for “Dished” and “Railed”.
For the purposes of this definition, suffice it to say that if the base is dried and shrunken, convex or concave, in relation to the top sheet or core of the ski, that’s very bad for ski performance.
Lastly, if you encounter situations where the ski does not glide well over snow, (typically wetter/mushier snow), this is a factor of wax application and the tune up (base texture) of the ski.
See my definitions for wax and base texture.
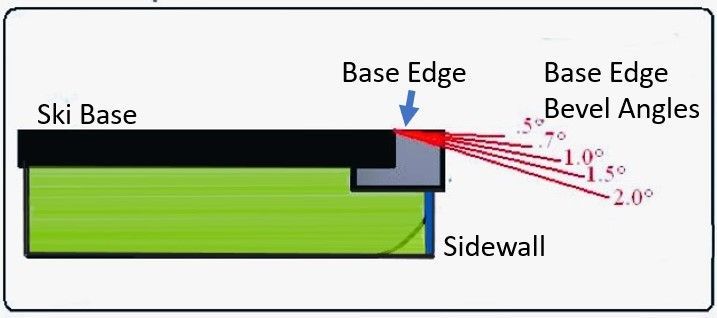
Base Edge – Base edge refers to the bottom-facing side of the metal edge at the lower corners of the ski. If you look at the bottom of the ski, the visible part of the metal edge are the base edge. In reference to tuning skis, a ski performs best when the base is perfectly flat, and the metal edges are angled up from the ground (beveled). Base bevel angles, on modern skis, range from .5 to 1.5 (see associated graphic).
As you increase base bevel, you will be required to create more of an angle at the ankle, knee, and hip to get the edge to hold and the ski to turn.
- It is important to note that a ski is practically un-skiable if there is no base bevel at the edge. Skis without bevel at the base edge tend to be “hooky” or will jerk from side to side when you try and ski the ski flat to the snow. Typically, carving/racing skis will have lesser degree of base bevel, and park skis/powder skis will have a greater degree of base bevel. On hardpack, the greater the base bevel, edging the ski to turn it creates greater stresses on the joints of the hips, knees, and ankles, and the more work it takes to turn the ski.
Note to race coaches and race dads; if you file the base edge/base file before every race your racer races in, without doing a base grind to bring the skis back to flat, all you’re doing is increasing base bevel, which reduces edge grip and puts higher stresses the racers joints. While the edges may feel sharper, you’re effectively making it more difficult for your racer to hold an edge and turn their skis.

Base Texture– (otherwise referred to as base pattern) – Ski performance is greatly affected by the smoothness of the base. A perfectly smooth base is not desirable for skiing. When a ski moves over snow, friction occurs. Friction creates heat, which causes ice or snow to melt, to varying degrees, for micro-seconds. That thin layer of water can create a vacuum (or area of lower pressure) between your ski and the surface it is sliding over.
Picture this; take two, smooth and clean, panes of glass, put a few drops of water on one, then press the two panes together. Then, try and separate them. You’ll find it very difficult (there are many YouTube videos around this science experiment).
This is the same physics that applies to ski bases and gliding over snow. To counter that, a fine texture is cut into ski bases, when you get a tune up, that includes a “stone grind”. The shape, depth, and width of that texture varies, and the general rule of thumb is that shallower, tighter textures work best in icy conditions (and racecourses), and wider, coarser textures work better in softer, wetter conditions. The texture cut into your ski base acts as channels for water to be moved away from the bottom of the ski, which reduces or eliminates the “stickiness” that occurs when a ski glides over wetter snow.
Note that if the texture is too coarse, the base will wear out faster on firmer/icier/man made snow. If the texture is too fine, it won’t reduce stickiness in wetter snow. This is why shops recommend skis be tuned every 5-10 days in good, consistent, natural snow conditions, and more often in firm conditions, drastic weather changes, or on man-made snow.
The drastic weather changes (temperature and snowfall) require different textures, and man-made snow, at the microscopic level, is sharper, therefore more abrasive, to ski bases. That abrasive snow will cause “freezer burn” and wear out your bases faster. (See my definition for “Freezer Burn”)
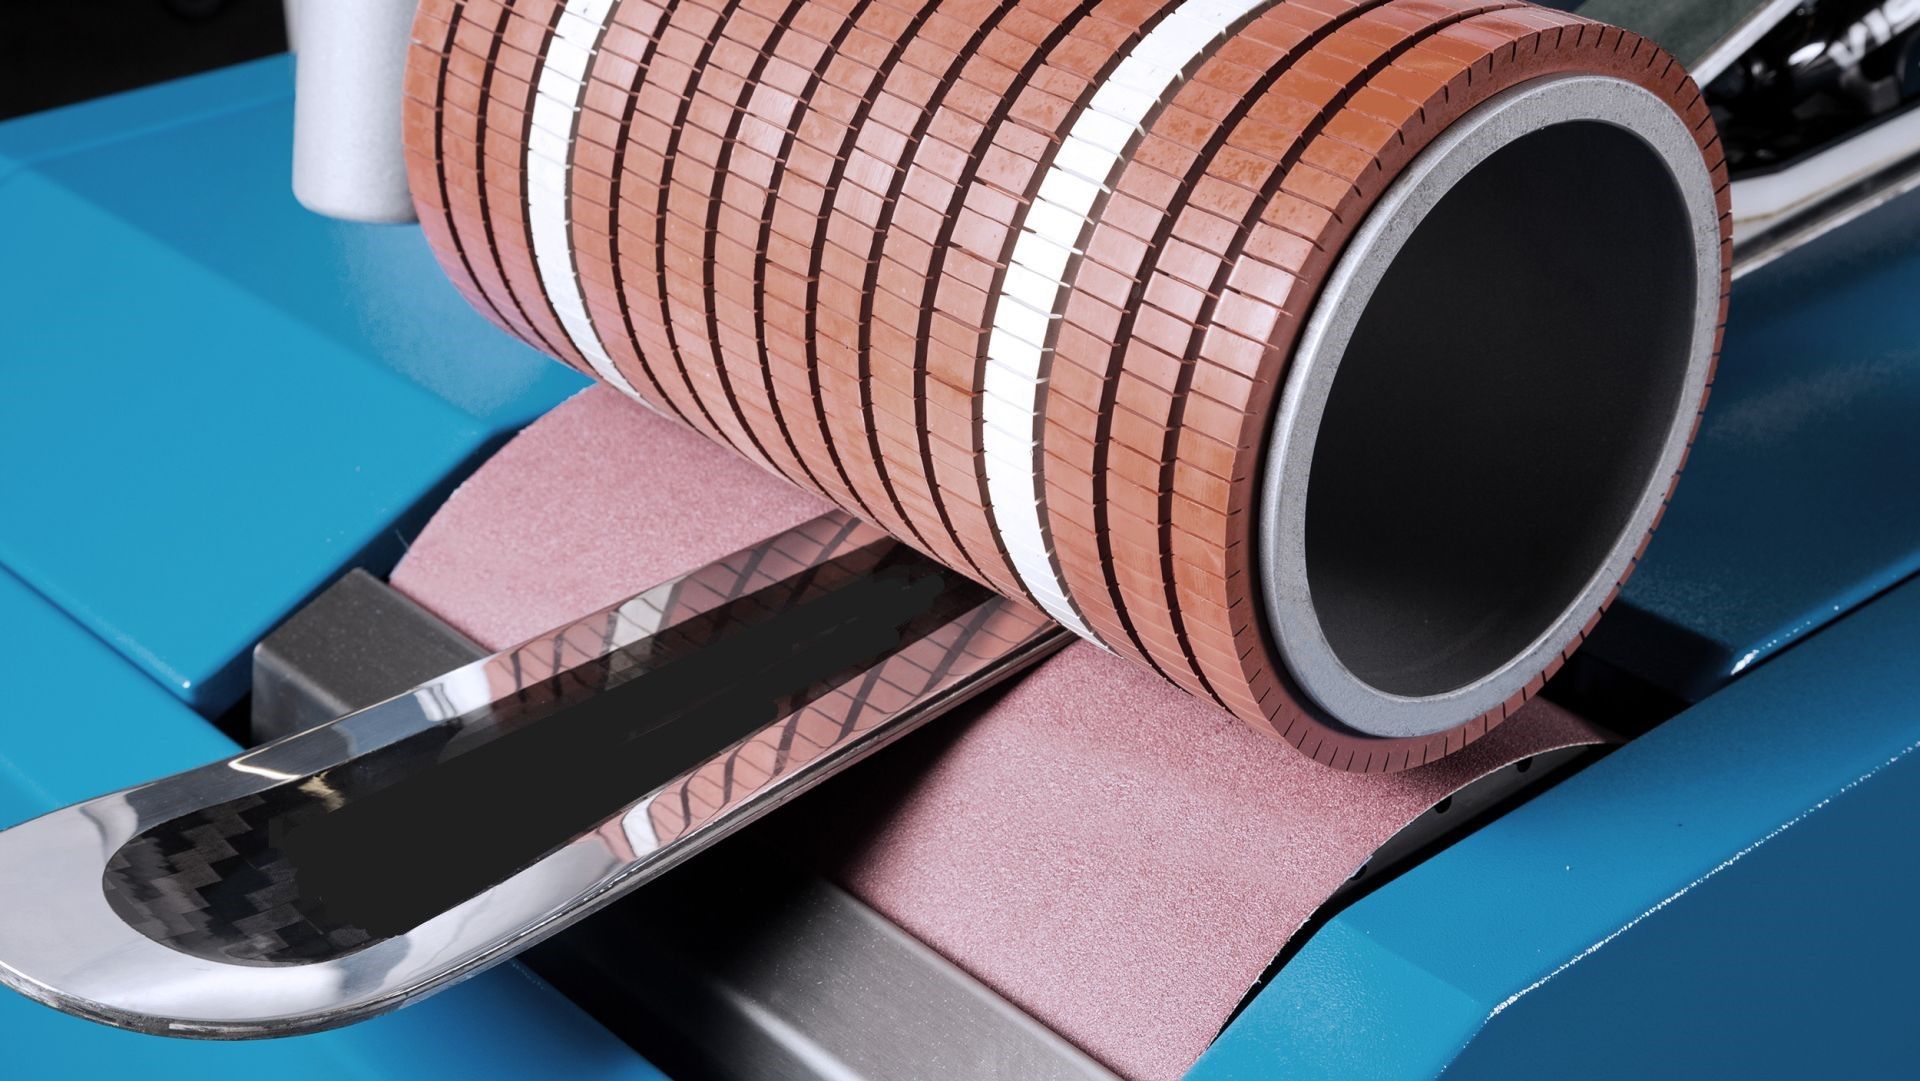
Belt Grind – Ski tuning machines have multiple ways of taking material off the base to flatten them. The “belt” is a larger version of a belt sander, with varying grits; from very coarse to very fine. Belt grinds tend to generate more heat, which reduces the quality of the tune up. Additionally, belts do not apply any kind of pattern/structure to the base of a ski. It’s generally a less expensive, lower quality finish for a tune-up, and is best used as a pre-grind to a stone grind finish.
In terms of process, abrasive belts (large rolls of sandpaper) rip material, which produces more heat. Therefore, the base expands more which allows the belt to remove more material. Stone grinding, more closely, resembles a cutting process, which is more accurate and produces less heat (heat is not our friend when it comes to ski tuning and maintenance, EXCEPT in the application of waxes).
Belt finishes are rougher to the touch, and don't hold up as well. Belt grinding a ski can help get a base (roughly) flat, but does not put a glide pattern on a base.
Brick and mortar – This generally refers to an actual, physical shop in a room, set of rooms, building, or buildings, that you can walk into and buy products from, as opposed to online shops.
Bindings/Binding Compatibility – Bindings are the devices which are affixed to skis, that interface with the boot and ski to hold the ski to the ski boot.
Bindings are subject to international standards which determine the measurement of forces related to ski boot release and retention, along with standards related to how boots interface with them and the purpose of those devices.
Bindings can be installed on skis on a track (as part of a binding system), flat mounted (specific drill holes are made in the ski, from a template which has been adjusted to accommodate the specific boot being used) or hybrid, which usually entails some combination of manual installation in pre-drilled holes, then adjusting the bindings on a track.
In recent years, the addition of several technologies have changed how bindings function and interface with ski boots.
GripWalk compatibility- GripWalk is a technology developed by Marker bindings, in league with Dalbello ski boots, which allows skiers to walk more comfortably, and with better grip on the ground than a traditional, flat, alpine ski boot sole. The change in the shape of the boot sole required a new standard be created (ISO 23223 A and C) as related to the interface between boots and bindings. Marker trademarked this technology, and licenses it to other manufacturers. GripWalk's web site is
https://www.grip-walk.com/
- Under the GripWalk category, I make references to "Hybrid" boots- this is a notation I use when identifying boots with GripWalk soles that have tech inserts (often referred to as pin inserts) for use with touring-specific bindings (often referred to as "pin" bindings). These boots resemble classic Alpine boots with GripWalk soles, but have hybrid functionality for touring and alpine, lift served, skiing. Most people use these for in-resort touring, where one can hike to the top of a trail without the use of a lift, while wearing your skis (assisted by climbing skins) then skiing down.
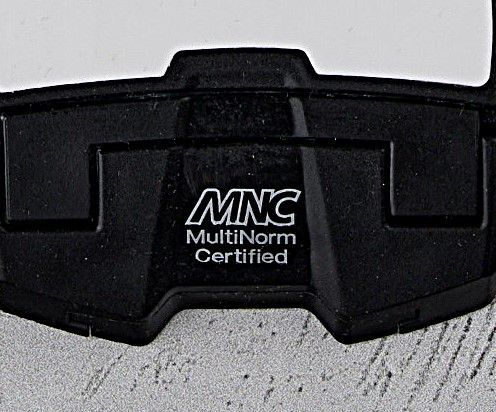
IMPORTANT: A ski boot equipped with GripWalk boot soles, MUST be used with a GripWalk, WTR (Walk to Ride), or Multi-Norm (MN or MNC) compatible binding.
Traditional alpine-only bindings ARE NOT compatible with GripWalk or touring/hybrid boot soles.
The easiest way to determine compatibility is to look for the GripWalk TM logo (see graphic on the right). All modern equipment (boots and bindings) will be stamped with a GripWalk logo to indicate compatibility.
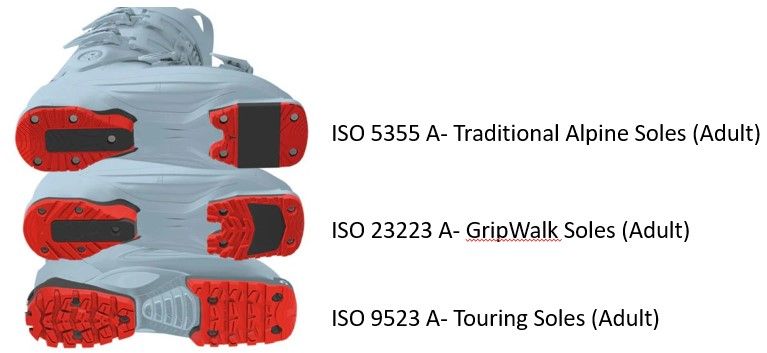
There are several boot sole types involved in certification with alpine ski bindings. The three certified sole types are:
ALPINE: ISO 5355 Type A [Adult] and Type C [Child].
GripWalk: ISO 23223 A and C [Adult and child].
Touring: ISO 9523- Bindings compatible with this standard are designated MN/MNC, AT, Sole.ID, ID, or have a specific blurb in printed on the binding toe (some Marker Duke bindings have this notation).
DISCLAIMER: At this point, I'd like to interject a personal observation related to ISO 9523 ski boots. Having installed, set up, and tested (as a certified binding technician) many of these systems, I have found that the test failure rate for this interface is significantly higher- in fact, almost all touring compatible binding and boot interfaces (regardless of manufacturer) I have installed with these boots have failed the initial tests, at the recommended settings. Some pass after readjusting per the binding manufacturers specifications, some have not.
Therefore, it is my personal recommendation that these boots not be used for everyday alpine skiing. They are designed for a very specific use (touring) and don't always function as well as a traditional alpine or GripWalk boot sole.
Again I must emphasize this is a personal observation recommendation, not a recommendation from the manufacturers. The manufacturers are all extremely diligent in meeting ISO standards, and maintain these standards with great pride. These efforts have greatly reduced the risk in the sport of skiing over the years, and we all must applaud that.
As for why these interfaces don't seem to do as well, I can only guess- It could be related to the fact that many ISO 9523 boot soles do not have a traditional, hard plastic AFD (anti-friction device). Additionally, the softer rubber(s) used in these boot soles may harden significantly in the cold, which may improve the reliability of release. I have only tested these systems indoors, at common room temperatures (60 to 80 degrees Fahrenheit).
For more specific questions related to this, I can only recommend you research testing around this.
There are others with strong opinions around boot to binding interfaces, not the least of which is Rick Howell, from Howell Ski bindings, who you can also follow on FaceBook and Instagram. He quotes several tests around these interfaces, and has them posted on his social media pages, and web page:
https://howell-ski-bindings.myshopify.com/
Additionally, you can call/email the customer service lines for the binding and boot manufacturers to verify compatibility. They are likely to know about any potential idiosyncrasies related to specific products.
I have found the customer service route to be very informative and helpful, from every manufacturer I have contacted.
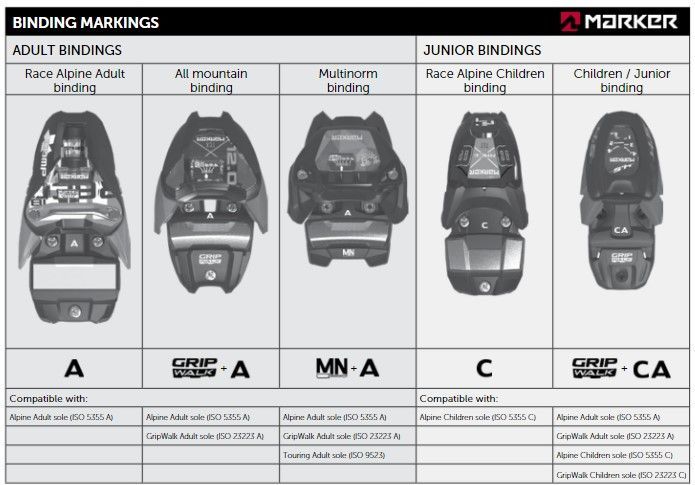
ADULT vs CHILD BINDING COMPATIBILITY: Most all modern bindings (especially those manufactured after 2024) have a notation inscribed on the binding toe related to this.
It is important to note that there is a size difference in the interface lugs on adult designated and child designated ski boots.
Adult boot soles will be marked with "A".
Child boot soles will be marked with "C".
Ski Bindings will be marked with:
"A" for adult only compatibility.
"C" for Child only compatibility
"AC" for compatibility with both Adult and Child boot soles.
Therefore:
Ski boots marked with "A" (near the centermark or on the boot sole) are ONLY compatible with bindings marked with "A" or "AC".
Ski Boots marked with "C" are ONLY compatible with bindings marked "C" or "AC".
Attempting to use incompatible systems greatly increases the risk of interface failure and injury.
I have included an easy to understand graphic from the Marker technical manual (2024) on the right, which shows examples of the most common markings related to ISO compatibilities.
Please note that while the shape of the toe is relevant to compatibility, that should NOT be used in determining boot to binding compatibility. Please ALWAYS rely upon the designation specifically marked on each component of the system and/or the technical manual for the product you are using. You can consult your local certified binding shop for information included in the technical manual(s).
Your certified technicians are your bridge to the manufacturers, and compatibility is limited to information provided in the manuals and testing.
A last note- Compatibility is NOT guaranteed by having matching logos. All bindings require inspection, specific set up procedures AND testing to determine final compatibility.
If an interface fails any of the above parameters, that system fails.
Some common reasons for failure (but not limited to):
BOOTS:
- Excessive wear to the interface lugs. Long story short, if you walk around a lot and drag your boots on the ground, you WILL wear them out prematurely, and cause failures.
- Adult/Child compatibility
- Cracks ANYWHERE on the boot. If there's a crack on ANY part of a ski boot, it raises serious safety concerns and that boot fails visible inspection.
- Oxidation: If there's a while haze on the plastic, faded plastic, rust on any of the screws, the boot fails.
- Loose toe/heel plates. If there's a gap between the replaceable plates on the bottom of your boot toe/heel, missing screws, missing chunks of plastic, etc, the boot fails.
- If the toe/heel lugs don't fall within the parameters of a lug gauge, or there's wear/ indentations to these parts, your boot fails. In some cases, new parts can remedy the situation.
- ISO Standard compatibility. I mention this obvious point because, by far, it is the most common reason (besides the bindings being too old/off the indemnification list). For example- very commonly, technicians cannot adjust or install your bindings because you bought a new boot with GripWalk soles, you already own skis, and your existing bindings can't be adjusted because they aren't GripWalk compatible. In many cases, boot manufacturers provide alpine sole conversions which will make the boots compatible with a traditional alpine binding. In most cases, these additional parts and their installation will cost between $30-$60. If there are no conversion soles available, you will need to replace the bindings or, in the case of a ski with a system binding, you will need to get new skis with compatible bindings.
BINDINGS:
- Cracks/excessive wear. If you kick your skis together on the lift, ski with your feet close together, or use your skis to disconnect your bindings, rub your boots on your bindings to clear snow from them, you can create enough wear for a visual failure.
- If an indicator window (for ANY settings) is missing, the binding fails. In many cases these can be replaced.
- Oxidation/faded plastic cause an inspection failure.
- If an AFD (anti-friction device) is seized, scored, worn, or any part of it is missing, it fails inspection. Some of these can be replaced. Most cannot be.
- IF YOUR BINDING DOES NOT APPEAR ON THE ANNUALLY UPDATED INDEMNIFICATION LIST PROVIDED BY THE BINDING MANUFACTURER, THAT BINDING FAILS.
Shops can remove and replace these bindings with an indemnified model, but, most shops will not work on these bindings. While some shops used to allow work on these with a waiver, most will not, anymore. Decisions around this revolve around the manufacturer and/or, in some cases, how risk is determined/managed.
Please note YOU CANNOT FORCE A SHOP TO WORK ON YOUR SYSTEM, EVEN IF IT IS STILL WITHIN SPEC.
- Working on a boot/binding system remains at the discretion of the shop, and they can refuse to work on them for any reason, including prior installations, remarks you make, or requests related to the installation.
- Requesting that a binding be installed in any way other than the manufacturers instructions may result in refusal by the shop.
- Installing a system that requires alteration to any component of the system may result in refusal. For example- A common instance I've seen, of this situation, involves the CAST system bindings. In several cases, installing them requires disassembling the original binding and replacing some parts with after market, CAST specific parts. This may void the warranty AND shop indemnification for that specific binding.
- If any installation screws are loose or missing, or there are gaps between the ski and binding, the system fails. These can sometimes be repaired.
These are only a few, more common examples, related to compatibility and technician responsibility.
Please note that the shop technicians are well trained to understand how your system works. If they fail your system, or refuse to work on it, it's for a good reason. Please "don't shoot the messenger", so to speak.
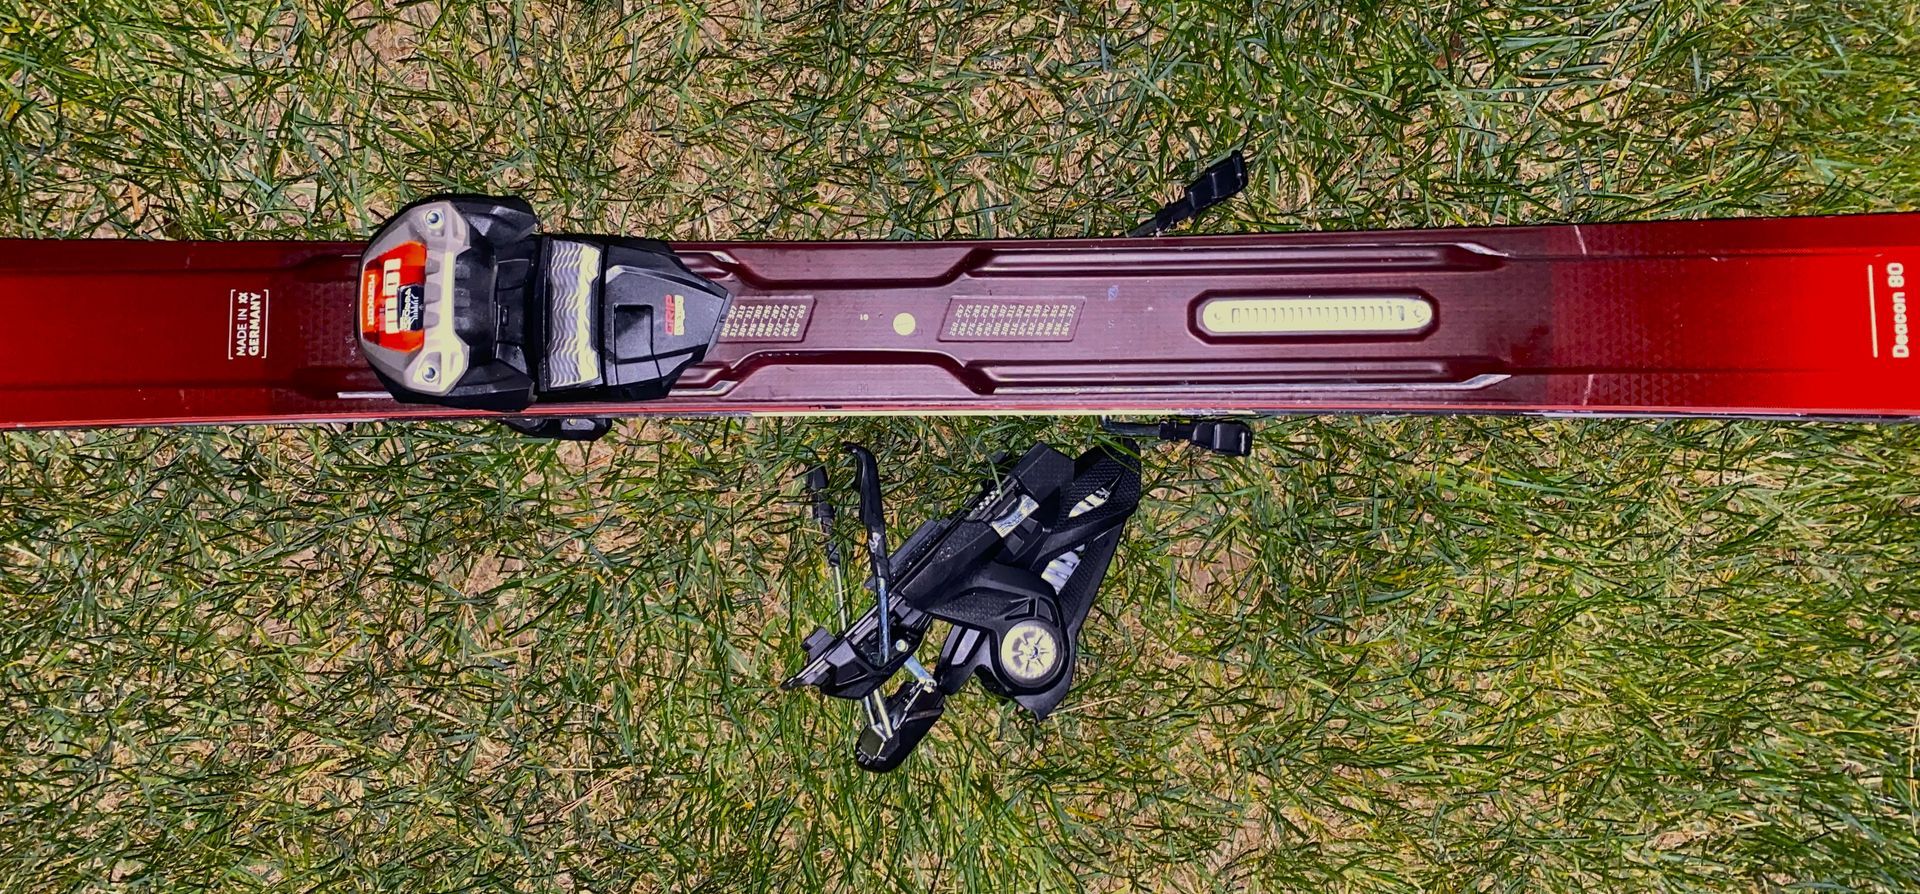
A system binding and installation track:
Bindings/SYSTEM BINDINGS – This refers to a ski-binding combination where the binding is included as part of the ski when purchased.
The advantages of a system binding are that it comes with a large range of adjustability, and does not require the ski be drilled/redrilled to install the bindings/readjust for new boot size. System skis and bindings also tend to be a little less expensive than buying separate components.
The disadvantages are the bindings are not transferable to another ski (unless that specific ski is replaced under warranty and the binding passes inspection and testing).
Also, system bindings tend to make the boot sit a bit higher off the ski, which has a (somewhat minor) effect upon skiing. Ski manufacturers thoroughly understand this, and engineer ski performance to compensate, if necessary.
In my mind, a ski with a system binding and it's performance is not made inferior to regular flat mounted skis. I own several system skis and they are awesome. Please don't listen to the gazillions of blogs in the blogosphere that say these are inferior... most of the people commenting would not know the difference if the same ski was manufactured with a system binding, or a flat mount.
Isn't it funny how conspiracy theories gain traction because "I read it on the iinterwebz, so it must be true".
With that, I give you....
Open System bindings - As of 2025, Rossignol has addressed this concern with their Open System ski and binding interface.
Simply stated, the bindings are modified flat mount bindings, with expanded adjustability. These eliminate the additional height created by the track many system bindings are installed with. Availability of these will depend upon several factors, and, as of the time of this writing, the bindings come pre-installed when ordered directly from Rossignol. They still require a certified technician, at a certified ski shop, to adjust and test them.
SIDENOTE: Should there be a price differential between labor costs related to flat mount and system binding installation?
This is an ongoing debate in the industry.
Firstly, labor is expensive, and those people need to get paid. on top of that, you're paying for expertise related to these products, and that's a very real thing. No shop should give away it's labor for free, as it undervalues the service they provide for you. The same should be said for all kinds of shop service.
The most common argument against the differential is that these bindings still need to installed on the track, and many require some pre-assembly, which is time consuming and, in some cases, difficult. On top of that, many still require adjustment and testing, so a single rate makes the most sense. Many race bindings and high-end ski manufacturers have system bindings which require a lot of assembly, and or gluing and screwing the binding to the ski, followed by adjustment and testing. Much of it is not as simple as sliding a binding on and testing it.
The obvious argument for the differential is that many system bindings come on beginner to intermediate ski packages, and are not as labor intensive as higher end systems. In my mind, it should be the shop's discretion as to whether or not to charge a little less for system installation. I know that many shops who sell these systems in a package charge less, or nothing, for the labor to install and test the bindings.
Again, a shop devalues it's expertise and limits it's ability to hire and train experts when they don't cover their labor costs.
In the end, it's far easier to manage the shop accounting with one price. That goes a long way, and it all comes out in the wash, in the end, because some higher end race-system bindings can take longer to install than some flat bindings. Not to mention that binding purchases for skis with previously installed bindings are time and labor intensive. Binding replacement requires the removal of the old bindings, plugging the old holes or using inserts/heli-coils to fix worn screw holes (for which there should be an additional charge for those as they fall under the repairs category, not installation), drilling new holes (often after time-consuming consideration of mounting point related to the position of previous holes) then continuing the installation and testing process. Extra steps and parts (plugs/inserts/coils/additional glue) mean more time and more cost.
The important point here is that any shop that has been around for a while knows better than to price gouge customers.

Camber– (Also referenced here is rocker) This refers to the distance a ski sits off the ground, in between the contact points, while sitting base side down.
If a ski has rocker, it extends either forward from the contact point (in the tip), or rearward from the contact point (in the tail).
Typically, the more camber a ski has (the higher it sits off the ground at the point furthest from the ground), the more "pop" it has out of a turn. Additionally, such skis tend to ski shorter, as it's more difficult to flex that ski and hold it through a turn, because that camber is fighting against remaining flexed (anti-cambered).
Rocker – This refers to the elevated tip and/or tail, beyond the contact points of a ski (see the definition for camber above). Rocker exists in varying degrees of lift off the ground, where the more extreme the rocker is, the shorter it turns and the easier initial float occurs while skiing in soft snow.
Slight rocker helps make a ski that's designed for hard pack more forgiving (less "catchy") while initiating a turn. For example, many race skis are fully cambered (no rocker) and require much more precise control in both turn initiation and finish.
In terms of skis designed for softer/deeper snow, more rocker allows a ski to perform with the combination of ease to initiate a turn on hardpack, yet retain enough surface area to to have sufficient float in deeper snow.
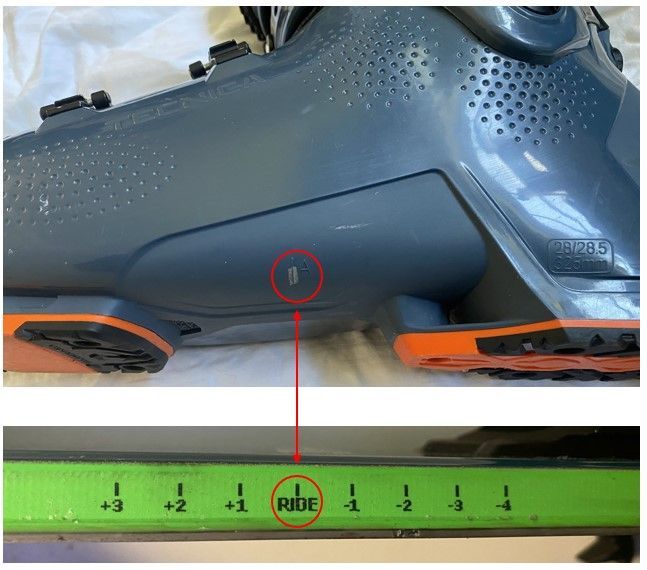
The graphics below show typical center marks on a ski boot and a ski sidewall. Note that the center mark on the ski boot is highlighted in silver for easier identification.
Additional note: This boot also has the letter "A" next to the center mark, denoting that this boot has an adult boot sole, which is important to know as boots marked as adult boot soles, are ONLY compatible with adult bindings (adult and child boot toes and heel lugs are different and incompatible sizes, therefore devices which are specifically designated as Adult or Child must not be combined as [C + A}, unless the device is marked [CA] ).
Center Mark – The center mark of a ski is the spot that coincides with the mid-sole mark on a ski boot, used to designate where that boot should be positioned when the bindings are installed. Center marks can be found on the sidewall or the topsheet of a ski, depending upon the manufacturer.
Ski Boots also have a center mark, which corresponds to the preferred mounting location of the ski boot, with the bindings, on skis.
When referring to skis, the term “Center Mark” is oft misunderstood, because it describes where to align the center of the boot on the ski- it does not necessarily point to the center of the ski's overall length.
The center mark(s) refer to the recommended location where the mid-sole of the boot should sit after the bindings are installed. When considering the overall length of a ski, the center mark could vary by brand and by ski genre. Some skis may also have multiple center marks, to designate different mounting points for different performance preferences.
For example- Twin tips will have a center mark that seems to be closer to the tip of the ski, and a carving ski may have a center mark that varies anywhere from 9 to 10 cm further back (towards the tails) than that.
Ski designers decide where best to position a skier on a ski, to maximize the overall performance of that ski, based upon what that ski is designed to do.
Many skis have multiple center marks, and may have a descriptor printed near each, which describes a performance style or type, as it relates to where the boot is positioned on the ski. Those descriptors may include the words “Directional”, “True Center”, “Recommended”, “Modern”, “Traditional”, etc.
The general rule of thumb, as it relates to where a center mark is placed and where the ski boot is placed in relation to that mark, is that if a boot center is placed forward of the center mark, the ski will perform such that it turns faster, but is less stable at speed. If boot center is placed aft (rearward) of the center mark, that ski will generally make a larger radius turn (be more difficult to make shorter turns with) but will be more stable at higher speeds. These rules of thumb, of course, work within a certain range of locations. Suffice it to say that if the boot is placed too far forward, or too far back, the overall performance of the ski will deteriorate significantly. Traditional rules limited ski boot center to be within 2 CM of center mark, because sweet spots were, generally, smaller, and skis were built to more specific performance characteristics (this is still true of race/carving skis). However, some skiers prefer that boot center be as far as 6 (+ -) cm forward from the designated ski center. These skiers, generally, prefer a ski that will be more balanced fore and aft for spinning tricks, and/or have a specific maneuverability profile.
-I'd like to add a couple points about center marks and binding installation-
Ski manufacturers designate their center marks to maximize that ski’s performance for a majority of skiers, for the intended use of the ski. People who prefer a different mount point, quite often, use the ski for a specific purpose, or a purpose other than what it was designed for. Additionally, these skiers have a particular set of skills that makes them prefer this different setup. I would advise skiers to be patient with shops who ask questions about how you came to decide that you want to install your bindings in such a way that your boot center will be different than what the manufacturers recommend. Look at those questions as a good sign- Shops who ask these questions are concerned about your experience on the ski hill, and are looking out for your best interests, in terms of how you will have the most fun skiing.
So, for example, if you ski on the east coast, but you request a mount point that western, big mountain, aggressive, trick skiers use, you should expect some questions from the shop- They aren’t suggesting you don’t have the skills to ski that ski like that, they are asking because, quite frankly, the experience on the east coast is different from western skiing in many ways, so you may never encounter situations where those altered mount points would be any fun. Again, this is where establishing a good relationship with a good, brick and mortar ski shop will enhance your skiing experience.
One last point- Some ski manufacturers used to use a toe mount mark to designate where the boot to binding combination should be installed. This is exactly as it sounds; the mounting template would be lined up such that the boot toe would align with the toe mount mark on the ski. This design for boot/binding installation has become exceedingly rare, especially as manufacturers are building in versatility to their skis based upon mounting point.
Skins are stored by applying a non-stick sheet to the adhesive side, then rolling them up. This makes them easily packable/storable.
Climbing skins/skins– These are devices which attach to the base, tip, and tail of a ski, (usually with the assistance of reusable adhesive) to assist in using skis to go uphill. Skins are either synthetic or natural, and have short hairs on them which lay flat going in one direction.
When sliding the ski uphill, the direction of the hairs (they point towards the tail of the ski) provide for easy glide.
Since those hairs point towards the tail of the ski, and they are very short, they provide enough friction with the snow to allow them to remain in place on the pressured/stationary ski while the other ski slides forward.
This allows uphill movement while wearing skis (it mimics the motion used when kick-style cross country skiing).
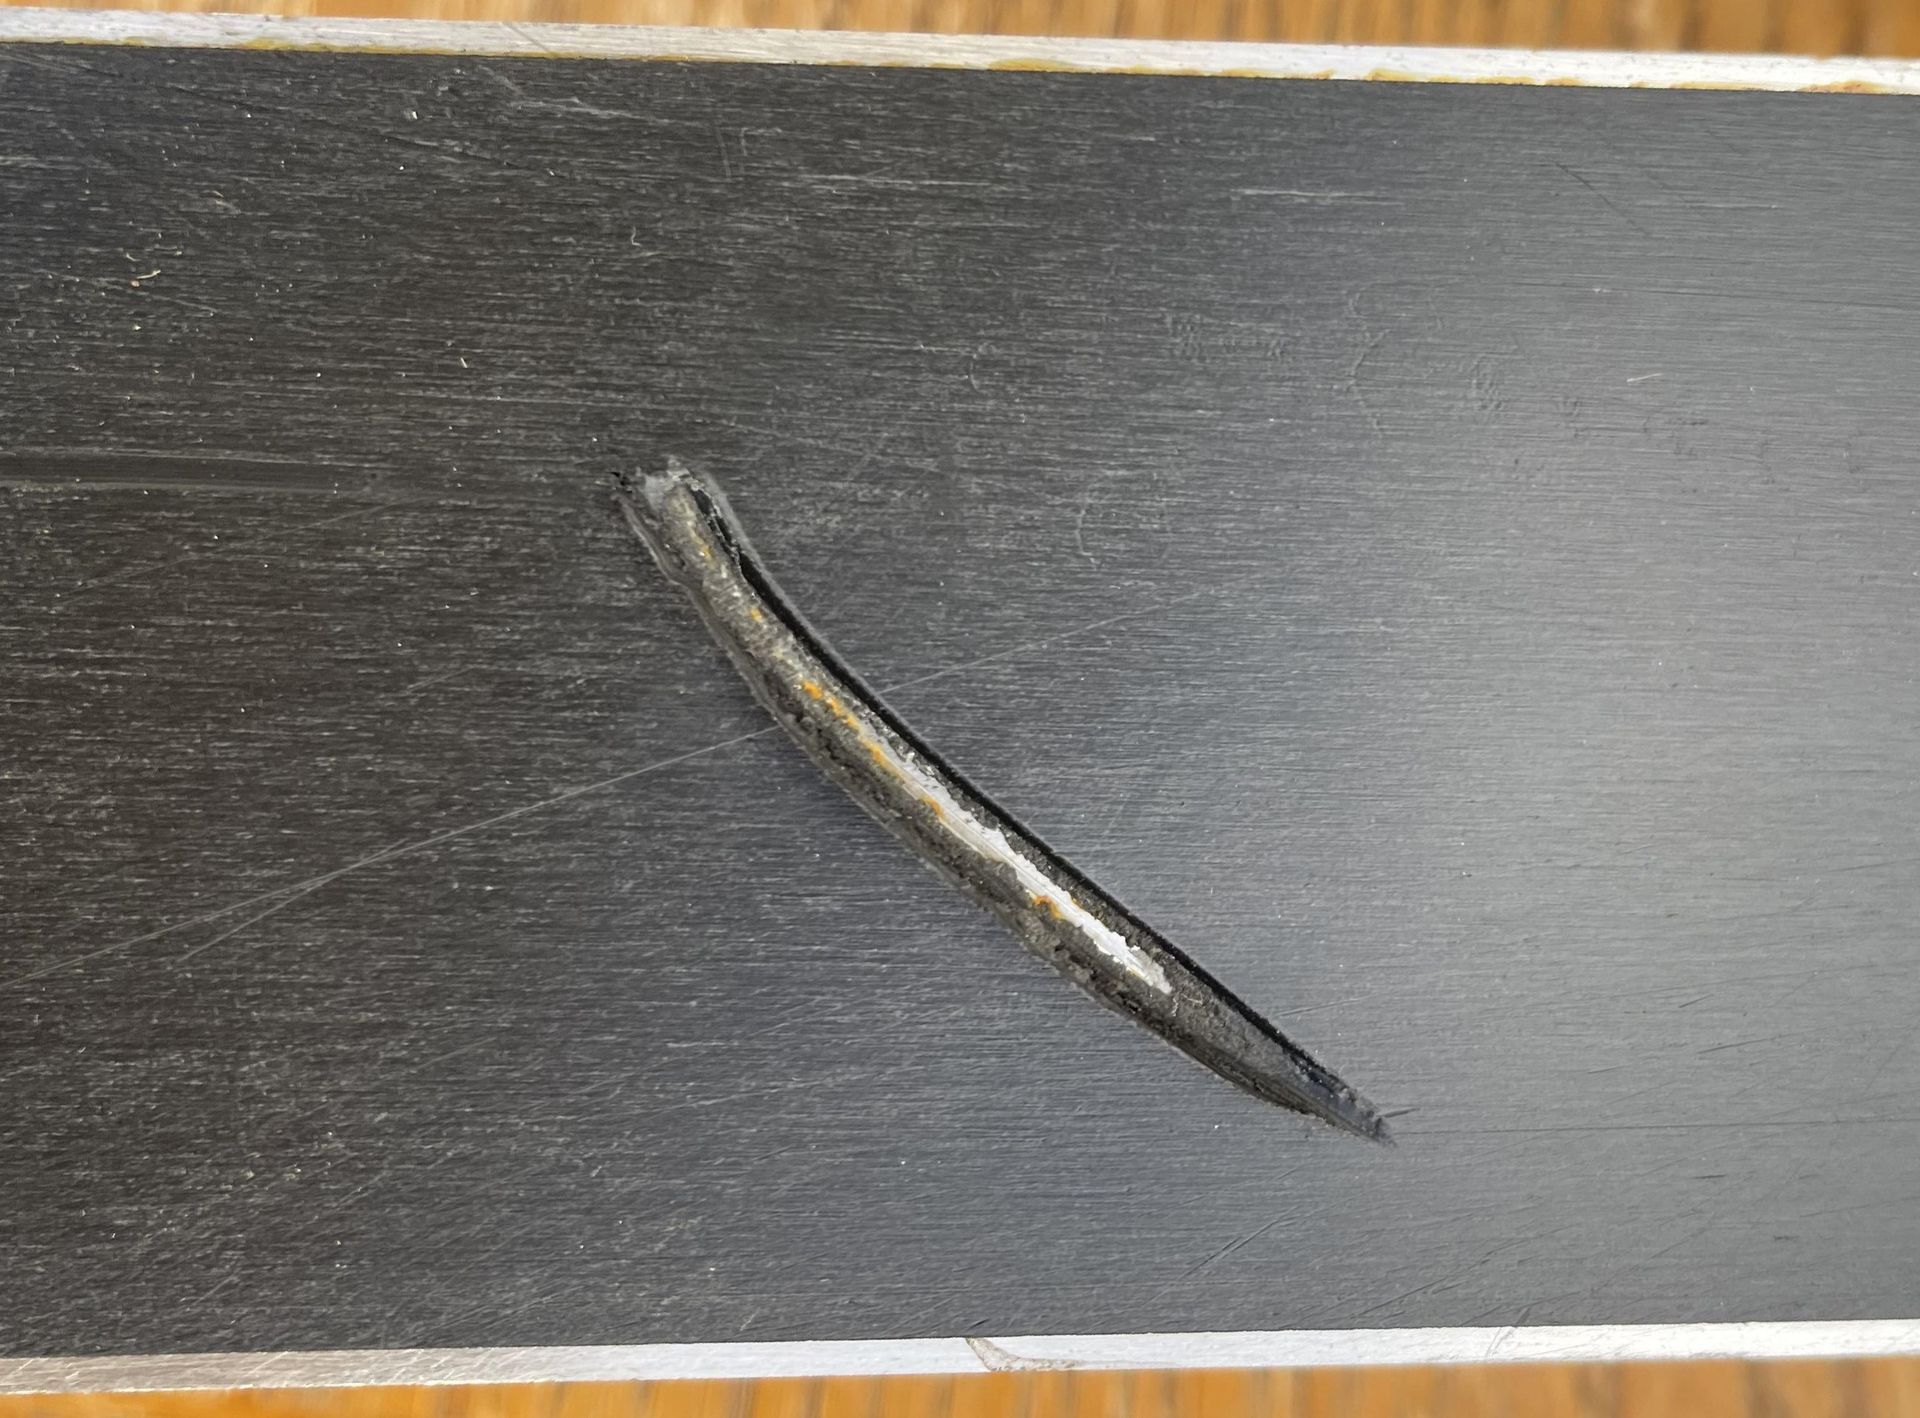
Some core shots will have frayed edges, which require being cut away.
The forces involved in the core shot below created raised and compressed base material surrounding the hole. This will need to be cut away, along with the frayed material to effectively repair.
Additionally, the oxidation on the metal layer of this ski, in the hole, will need to be cleaned out prior to welding melted base material.
Core shot – This refers to base damage (usually a hole in the base, most often due to rock or stump impact), that is deep enough to extend through the base material of the ski and to the next layer. Core shots always require a repair to continue using that ski (typically a base weld). P-Tex candles (P for polyethylene) are made to stick to polyethylene base material. P-Tex will not stick to the next layer (typically metal, fiberglass, or wood).
Failing to repair a core shot will allow water to seep into the core of the ski, where it’s possible that it will cause more damage by dissolving core materials, oxidization, or upon freezing and separating (delaminating) layers of the ski. Note that some skis are easier to repair than others, and some skis, once the core is exposed, may be damaged beyond use. That will depend upon how much base material is left on the ski, the materials involved, and other damage that may have occurred to the ski. Core shot damage must be taken in context with each particular ski, and the costs to repair. Core Shot repair can be time consuming and may require cutting away damaged material then welding melted base material and compressing it into the hole to repair the damage. Some types of damage may require cutting specific shaped pieces of base material and “splicing it” into the damaged section.
Again, for those of you looking to repair a core shot at home, core shots, at a minimum, usually require a base weld to repair. Melting P-Tex fill into a core shot is almost always insufficient to repair such damage, as P-Tex will generally bubble and/or not stick to core materials. In many cases, attempting a P-Tex repair where base weld is required, will cause more damage.
Typical costs to repair holes that require base weld or splicing-in new material, will vary from $20 to $100 per centimeter, depending upon the type of repair, amount of damage, repair material required, and time required to make the repair.
Also, is is important to point out that the repair will often be a larger area than the hole, because material will need to be cut away to effectively make a lasting repair. Repair costs will revolve around the size to repair, not the size it is when it comes into the shop.
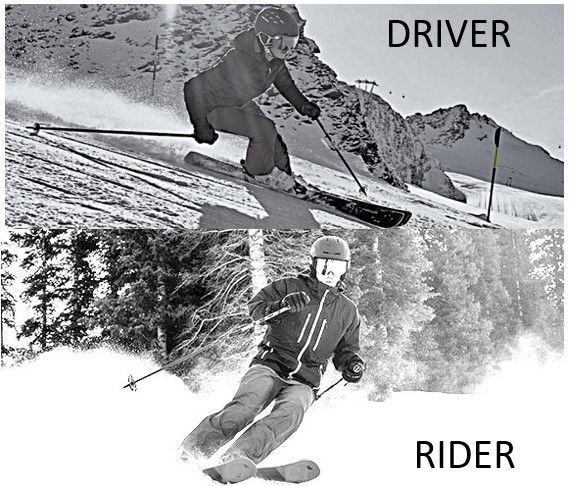
Driver
–
When I use the term “Driver”, I’m generally referring to skiing style where the skier positions themselves in a strong, athletic position, where their hips are low, knees bent, and shoulders are over their midfoot. This position is generally neutral (not leaning fore, aft, or side to side), and presents a strong position for reacting to terrain. In other sports, this position is comparable to how a middle linebacker in football would stand prior to the snap of the ball. Drivers tend to use well controlled turns for control and performance. Drivers are not necessarily experts, intermediate, or beginner skiers, but racers use the "Driver" style.
Being a driver is more about an emphasis on control over the ski rather than allowing the ski to dictate the run, (or straightlining). The classic driver style involves using the entire length of the ski proportionally throughout the turn. In other words, the amount of time pressure is distributed to tip, mid-ski, and tail are more equal than that of a “Rider”.
I often use the term “Driver” with the word “Rider”, when talking about who a particular ski may appeal to. Drivers prefer a ski which is designed such that the balance point is geared to somewhere between forefoot and mid arch.
Drivers have a more compact stance, in comparison with the upright stance of a rider.
Note: Driver is also a registered technology in ski and binding manufacture. My definition, as it applies above, has nothing to do with those technologies.
Foam Core–This is a method of construction where artificially created materials are injected into a mold, or directly into the core of a ski. Some types of ski construction use an external frame (like an exo-skeleton) with foam injected within. Advantages of foam core ski construction is that they are significantly lighter than other cores, and the performance characteristics of that ski can be consistent over a large production run of ski.
One disadvantage of foam cores is that they tend to break down faster than other materials, depending upon the density of the foam and it's other properties.
In past decades, Rossignol, Dynastar, and Salomon, most commonly, used some form of foam cores in the production of their skis.
Ski manufacturers have, for the most part, moved away from full length foam cores. However, some sections of skis may still employ foam to lighten it.
Some beginner skis, and, ironically, race skis, employ sections of foam in their cores.

F.I.S. – Often pronounced “FISS”, F.I.S. stands for Federation of International Skiing (translated to English). Most often, this comes into the vernacular when someone has a child who is involved in ski racing, or someone was involved in ski racing themselves. F.I.S. places a set of standards around F.I.S. sanctioned ski racing. Those standards govern Olympic skiing, and many organizations adhere to those regulations. Skis, snowboards, and accessories (helmets, protective gear, etc.) under this governance, must meet very specific standards as to size, shape, levels of protection, etc. So, if your child’s coach says to you that you need to get a F.I.S. rated ski racing helmet, it must conform to specific standards (which include, but are not limited to, an impact rating, ear covering, the ability to add protective face coverings, etc.) Long story short, anything that meets F.I.S. requirements, tends to be more expensive, since it has to meet a specific performance standard.
Most equipment (but not all) which complies with F.I.S. will be marked as such.
Freezer Burn
–
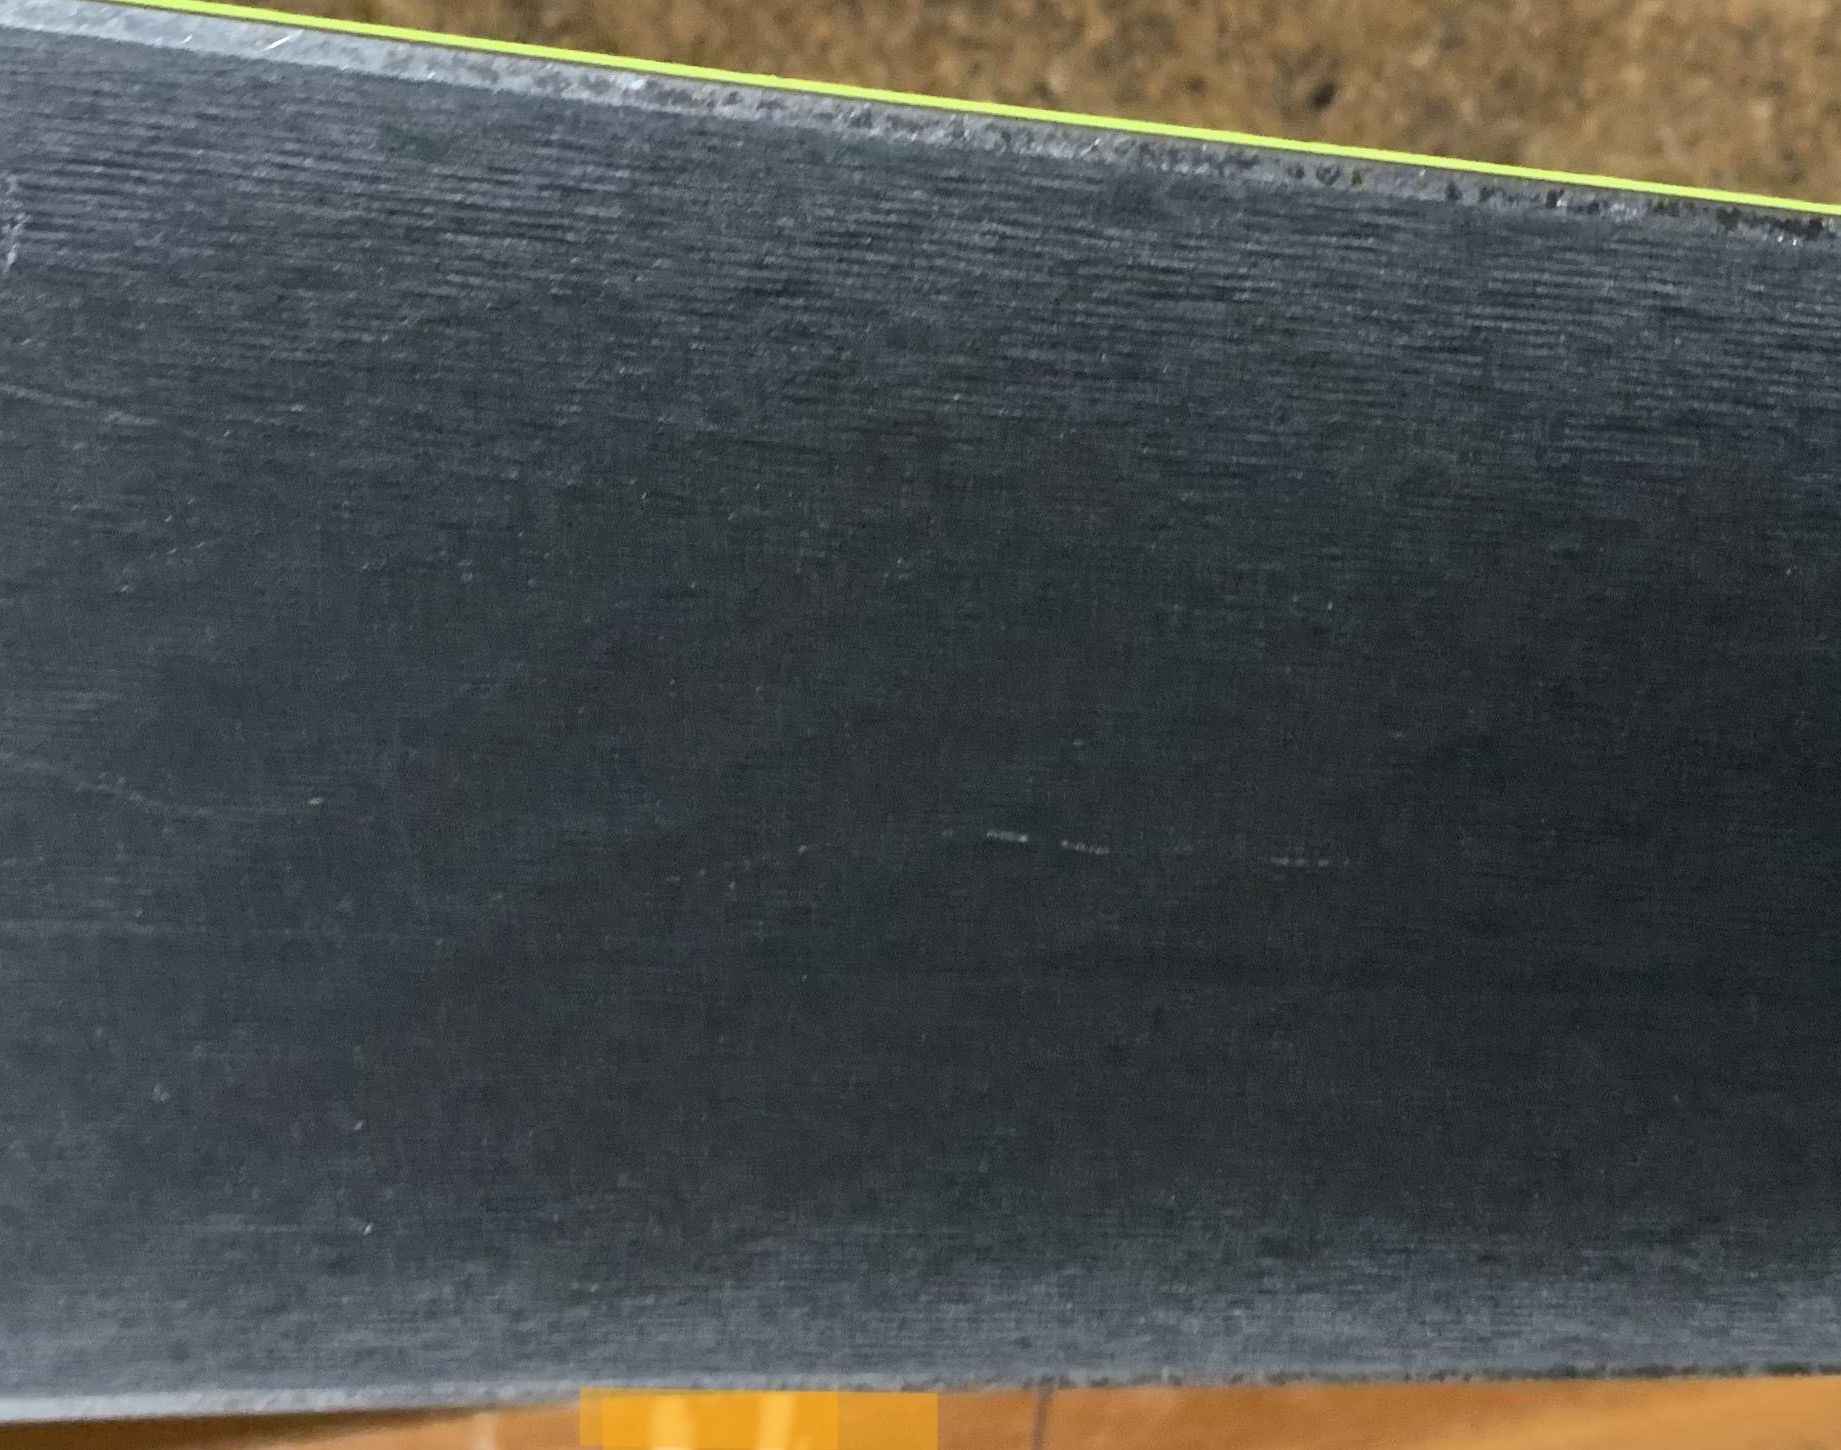
Freezer burn occurs on ski bases, most typically after being skied on man-made snow. Man made snow is more abrasive and causes a white-ish haze to appear on ski bases, generally starting closest to the edge and expanding towards the centerline of the ski base over more days of skiing. You may be able to scrape it away with your finger nail or ski scraper, but it is a sign of oxidation and wear on your base that increases the base bevel of your skis (an undesirable situation- see my definition for “Base Bevel”). You can reduce freezer burn by applying the correct wax for conditions, more often, and having the appropriate stone grind tune up.
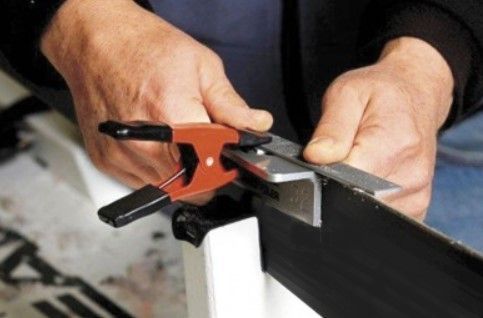
Hand Tune / Hand Finish
–
Hand tuning generally refers to using hand-held guides in conjunctions with files, ceramics, or diamond encrusted devices, and other tools, which give a finer finish to the ski tune.
Hand finish may also mean using machines to do a basic tune, then putting a finer finish on the edges by hand.
The advantage to a hand tune/hand finish is that the finer finish is more durable, and tends to remove less material over the life of a ski.
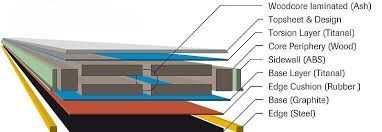
Laminate/Laminated Construction –This is a production process where a ski is assembled in layers- usually under heat and pressure.
For example, when discussing a "sheet of titanal", that refers to a relatively thin layer of metal laminated to a ski.
Laminated materials/components may include wood, metal, carbon, fiberglass, polymers, glues, rubber, etc.
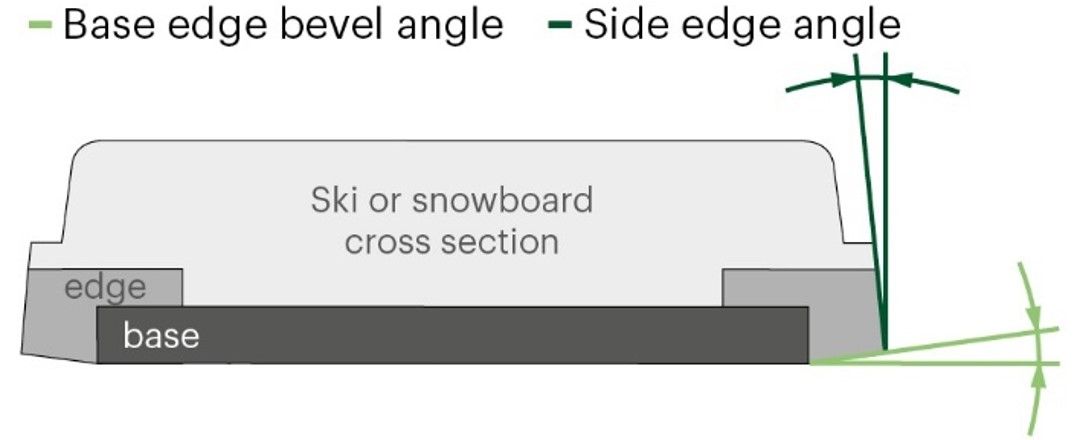
Side Edging – Side edging is part of the tuning process for skis and snowboards. Modern skis all have a pair of metal edges, which are located between the base and sidewall of a ski/snowboard, where the lower corners are on the ski. If you look at a ski from the side, the visible part of the metal edges are the “side edge”. (see dark green references in the graphic)*:
The sharpness of that edge, is determined by the bevel angles on the bottom (base edge), and side (side edge). Side edge angles are commonly referred to in degrees. The more acute the angle (for example, 3 or 87 degrees), the sharper the ski. Most modern skis come from the factory with side angles of 2 or 3 degrees. To give you an example of how that applies in the real world, slalom race skis, traditionally, have always been 3, sometimes more. Consumer skis tend to be 1 to 2 (89 mor 88) degrees of side edge bevel.
Sharpening a side edge can be done by hand with a combination of hand tools (varying coarseness of files, diamond encrusted and ceramic tools), or by machine (most commonly using various coarseness belts and spinning ceramic stones). At some point over the life of a ski, the metal edge will no longer protrude beyond the sidewall of a ski. Once the metal edge and sidewall are even, a tool is required to shave away some sidewall (sidewall planer) to make the edge accessible for tuning.
Ski edges come in different degrees of thickness and hardness; they can also me solid or segmented. They can wear out naturally, or be damaged via friction or impact with objects (rocks, stumps, ice chunks, other skis, etc.). Minor damage can be removed through the side edging process. More extreme damage may require a more extensive use of tools, or outright replacement of a section of edge. It should be noted that no edge replacement will be as strong or as reliable as the original edge, so continued use of that ski will require a different approach to its use. Not the least of which, is using the repaired edge as the “outside edge” (wearing the ski such that if the damage is on the left edge, that ski is used on the left foot, or right foot for right edge damage).
Lastly, as a general rule, Edge grip is more a function of the quality of the tune up, than the perceived sharpness of the ski. For example, a smoother, cleaner edge sharpening with finer coarseness diamond encrusted tools will last longer, and hold better, than a coarse file or coarse diamond stone tune. Having good skills as a ski tuner is far more important than using an inexpensive side edging tool every time you ski.
So, if you use a side edger on your skis prior to every skiing activity, and those edges feel like they would cut you if you ran your hand over them, odds are your tune up won’t last the entire day and you are, most certainly, drastically reducing the life of your skis (Take note race coaches and race dads who file your racers edges before every race). At the microscopic level, the more smoot an edge looks, the longer it lasts. Removing the microscopic burrs that occur on a metal edge, from with coarse tuning tools, lengthens to life of the ski because friction tears and wears away those burrs in a catastrophic manner. Less/smaller burrs means less/slower wear and tear from friction.
As a general rule of thumb, the smoother the edge feels to the touch, the longer it will hold up.
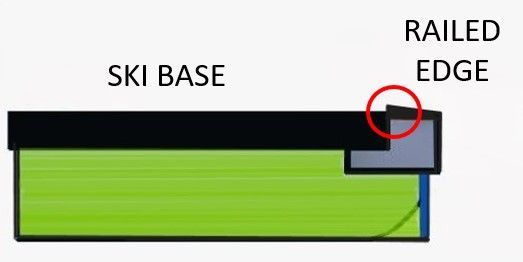
Railed
–
A ski is considered “railed” when a ski is placed on a flat surface, and only the edges make contact with that surface. In this case the base can be flat or concave, but the edges are not flat to the base. This can happen because of base shrinkage but is also common due to poor production techniques or quality control. This can usually be repaired by a highly skilled ski tuner. It should be noted that railed skis can do significant damage to the stone in a stone grinder and skis can be propelled at great speeds out the back of said grinder. This is a very dangerous situation. While this can happen with extremely dished skis, it is most common with railed skis.

Rider
–
When I use the term “Rider”, I’m generally referring to a skiing style where the skier positions themselves in a more upright, relaxed position on a ski. These skiers tend to use mid-ski and tail more than the tip of the ski. The general attitude of a “rider” is that turning is overrated, and these skiers
refer to themselves as "riders" (e;g I rode my fat skis at Killington today) Generally, riders don’t prefer carving skis. Riders tend to point skis in a general direction and turn more for the purpose of maintaining a direction or avoiding obstacles, than speed control. Their preference is to let the ski run as fast as they are comfortable, and scrub speed just to stay within their comfort range. Riders tend to prefer a ski where the balance point is geared to somewhere between the mid-arch and heel of the foot, which allows them to stand more upright and relaxed.
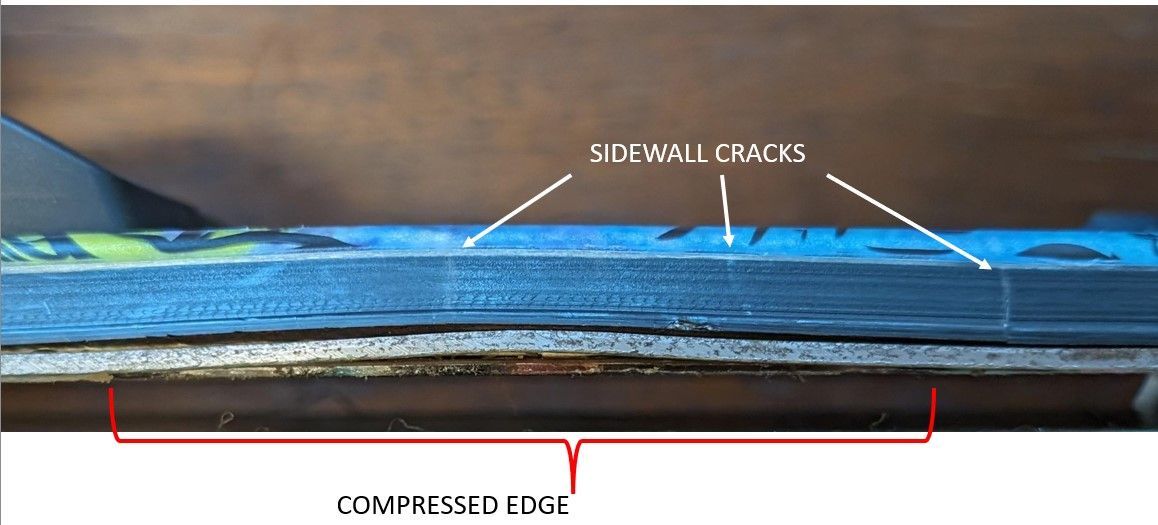
Blown Sidewall:
Intact Sidewall:
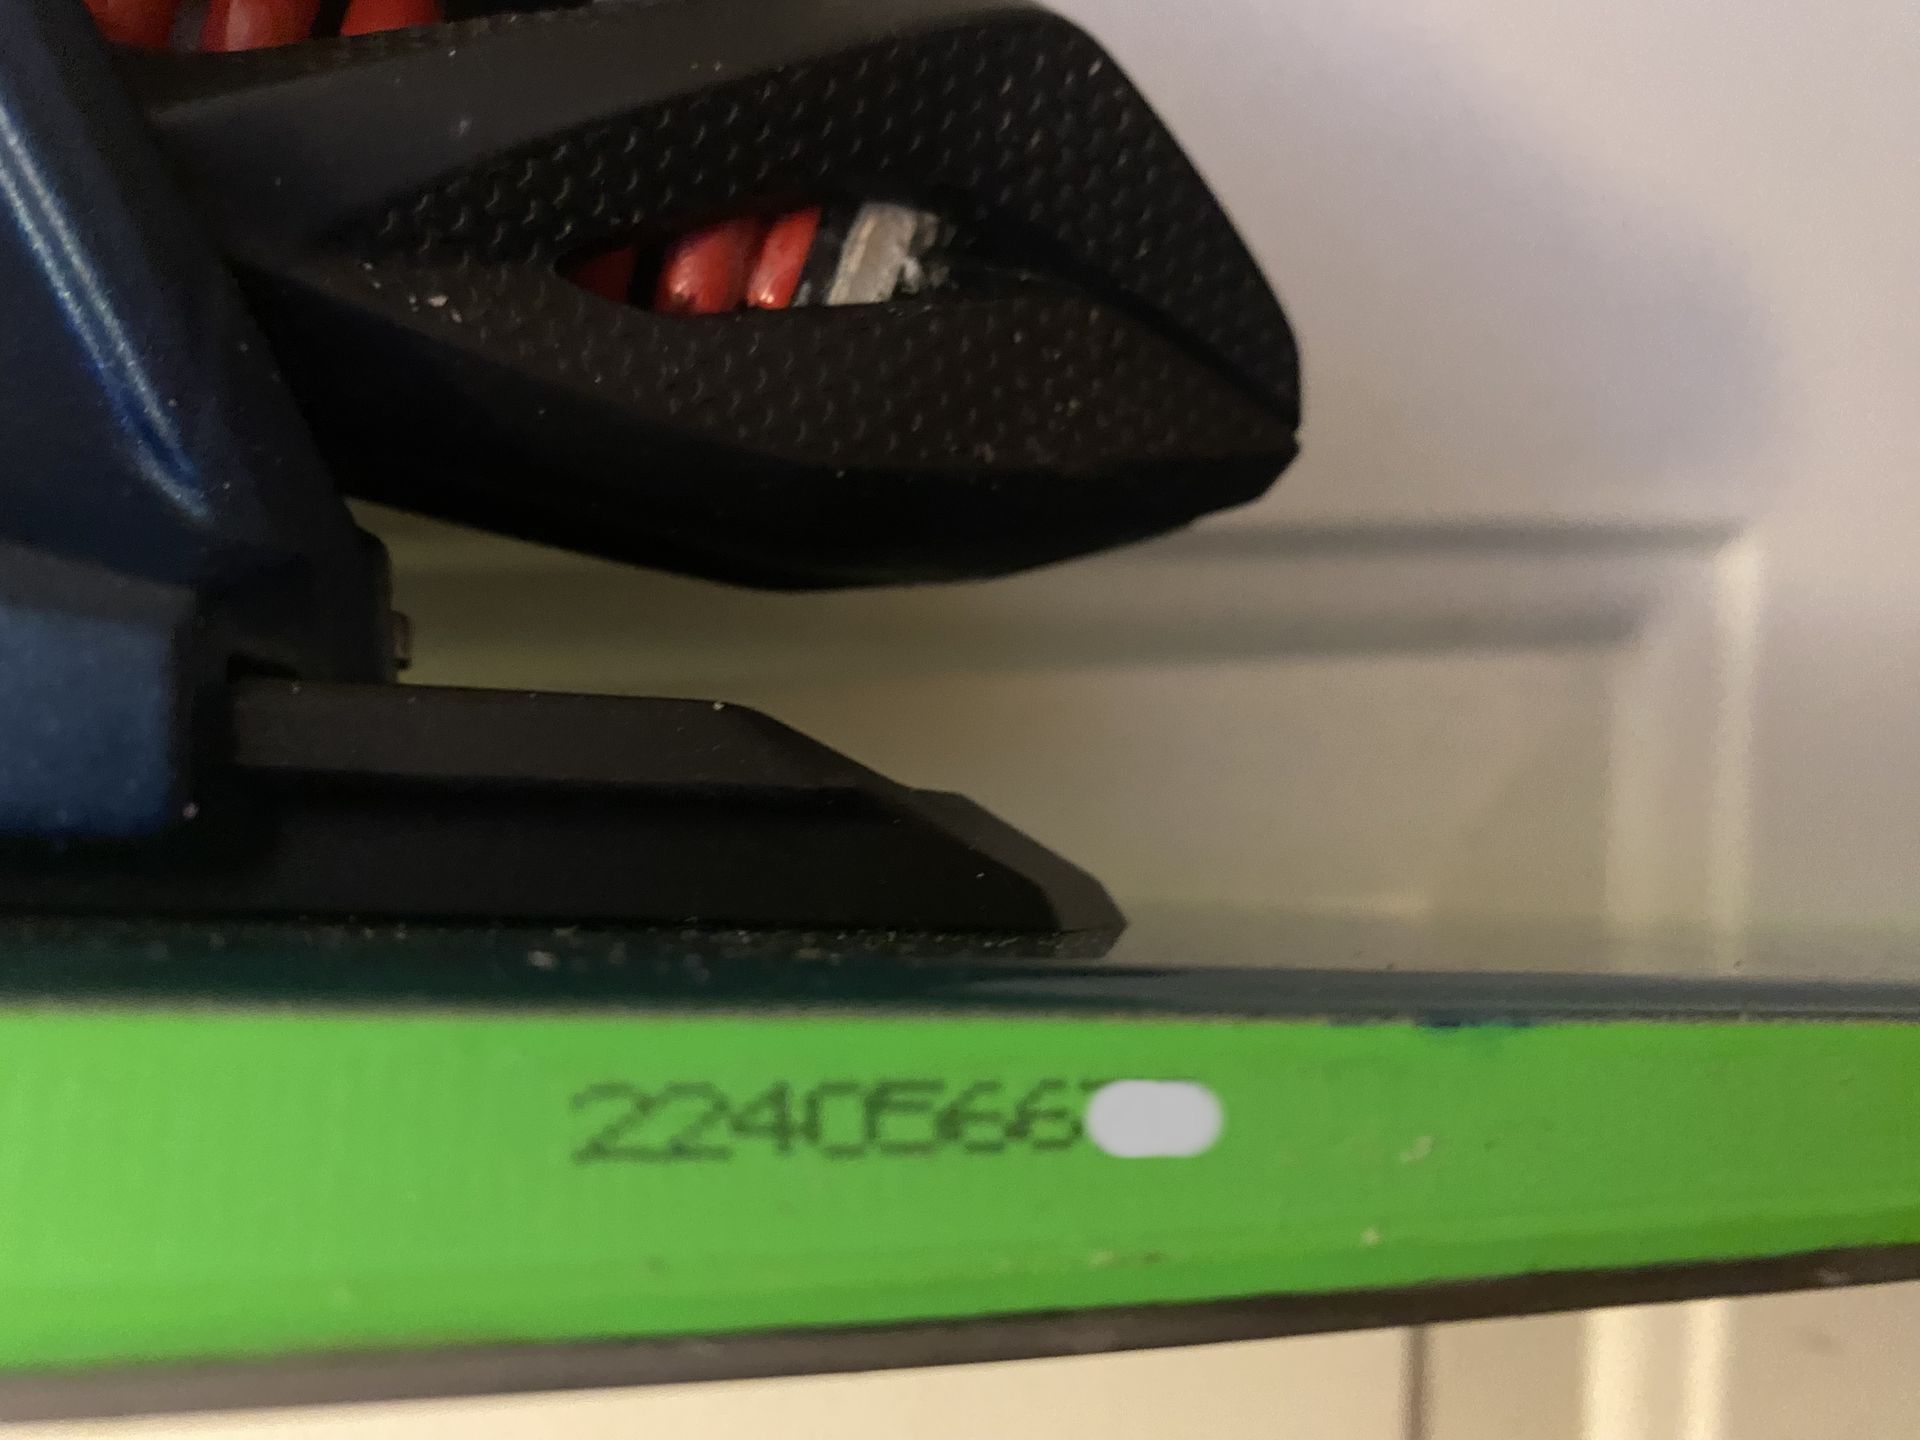
Sidewall – Sidewall is the place on a ski that fits between the top sheet and base edge (see the bright green part of the ski in the photo to the right). Side wall exists in various thicknesses, hardness's and densities.
Side wall construction has an effect upon the performance of skis. As a general rule of thumb, race skis have a harder, thicker side wall, and park skis have softer, more flexible sidewall.
Ski damage resulting in a cracked sidewall will likely result in altered performance of the ski. Quite often, such damage is an indicator of much more serious damage to the core of a ski. Sidewall is, most commonly, cracked or broken when a ski edge is compressed into it via an impact with something. This can occur from hitting rocks, stumps, ice chunks, rails or other features in a park, hitting another ski or snowboard, lift footrests, falling out of a ski rack, or any number of things. As a general rule, if you look at a ski from the side and the edge is bent, there will likely be some kind of damage to the sidewall, such as cracks, separation from the core, separation from the base/edge or top sheet. The ability to repair sidewall is situational, just like repairing a core shot. However, the odds of being able to repair sidewall damage are much lower than filling a core shot. Again, the sidewall is structural, and affects the performance and ‘skiability’ of the ski. Many shops will not “risk the liability” of repairing sidewall damage, although, it should be noted, that liability is a term used loosely in the industry.
Folsom Custom Skis does a great job describing sidewall with some awesome visuals. You can find that info here:
https://www.folsomskis.com/folsoms-guide-to-ski-sidewall-construction


Torsional Flex:
Longitudinal Flex:
Ski Flex – All skis must flex to be skiable. Imagine trying to ski on a 4X4 fence post with metal edges… That sounds awful, and it is.
You need a ski to flex so you can turn it- when you tilt a ski on edge, and flex it, it attains a modified "C" shape. That "C" shape becomes the basic shape of a turn.
As a ski flexes, it absorbs some of the shocks (energy) of moving on and through ice and snow.
Included in this section are different ways in which a ski can flex.
The two most common modes of flex, when discussing ski performance, are torsional and longitudinal flex. The other two modes of flex also affect performance, but usually show up more as vibration (flex at higher frequencies).
Torsional flex – This is colloquially known as “Twist”. Skis with minimal degrees of twist, from tip to tail, have better edge grip. However, the stiffer the torsional flex, the more precise the edge grip, and performance, of the ski. Race skis are a good example of torsionally rigid skis. Does that mean skis, which are torsionally rigid, are more desirable?
Not always- here are a few examples why:
-Beginner skis: Beginner skis will be less torsionally rigid at the tip and tail, to allow the ski to enter, and exit a turn, in a more forgiving manner. In other words, the ski won’t jerk you into a turn, or hold too firmly when finishing a turn (which makes it more difficult to end that turn and start another). Being less torsionally rigid, tip and tail, allows the ski to have a bit of a skid when entering and exiting a turn. That helps a beginner get a feel for turning without being thrown out of balance.
-Park Skis: People who perform tricks on skis don’t need a ski that’s particularly stiff- especially in the tip and tail. It’s easier to butter, rail slide, land certain tricks, etc., when the ski isn’t super grabby. The very nature of park skis is that they are softer, and more forgiving than race skis.
-Powder skis: Powder skis tend to be bit more playful, and consistent, when a certain amount of torsional flex is “tuned” into the construction, in concert with longitudinal flex.
Longitudinal flex- This is the way a ski flexes from tip to tail. When people refer to a ski’s stiffness, this is, usually, what they are referring to.
If you stand a ski upright on the ground, hold the tip, and press, with your other hand, at or near the center mark of the ski to flex that ski into a “C” shape, lengthwise, this is longitudinal flex. Skis with less longitudinal flex tend to be snappier, which gives them more spring (power) when exiting a turn. Race skis are typically stiffer, longitudinally. A fringe benefit of that is better edge grip, in concert with torsional flex.
Does that mean a ski which is stiffer longitudinally is preferable to a ski that isn’t?
No- here are a few examples why:
Stiffer skis are harder to turn.
Stiffer skis don’t absorb bumps as well as a softer ski.
Stiffer skis don’t float as well in deeper snow (as a general rule- there can be exceptions).
Stiffer skis generally require stiffer ski boots to make them function better.
Stiffer skis have more rigid materials in their construction, (for example, a sheet of Titanal) and they are more likely to bend in an impact or accident, rather than flex and recover.
-The next two axes of flex more commonly enter the picture as types of vibration-
-Lateral flex occurs when the tip and tail of a ski get closer to each other laterally instead of longitudinally.
Picture a straw that you put on a table. Press that straw flat to the table- now it roughly resembles a ski. If you bend that straw, such that the two ends of the straw come up off the table, that is longitudinal flex. Now, hold that straw flatly on the table and bend both tips to the left (a backwards “C”, or both tips to the right (a normal “C”), or both tips in different directions (like an “S” or “Z“ shape) then you’ve flexed that straw laterally.
Lateral flex is very undesirable in a ski. Imagine skiing along and the tip and/or, the tail of the ski is darting left and right while you’re trying to go straight. That results in loss of control. Most skis have little to no flex on this plane, and manufacturers do everything in their power to eliminate this. Most movement in this fashion tends to be vibration, especially when you push a ski beyond its design limits to absorb vibration.
Let’s note that ski vibration occurs in all four axes as well, and they tend to happen at the same time. When vibration amplifies to a point where a ski can not dissipate it effectively, the ability to control a ski is reduced as well as lost edge grip. This is why manufacturers use different densities of wood in the core of a ski, often along with polymers, carbon, fiberglass, Titanal, etc. Manufacturers can also add devices added externally, most likely to the top sheet, to deaden vibration.
The last kind of flex/vibration involves the base edges of the ski getting closer together, like you’ve taken the fortune from a fortune cookie, laid it flat on a table, and rolled it up lengthwise to make a straw out of it. This would also represent a loss in edge grip and control over the ski.
In a nutshell, flex is desirable in skis, and manufacturers tune the flex of a ski to match certain, targeted, performance characteristics, which match the genre of skiing/skier type they are building that ski for.
Conversely, vibration (amplified frequencies), is generally bad. At a minimum, it is uncomfortable. As it increases, it becomes dangerous. If you’ve ever skied a ski beyond its speed profile (gone too fast for a particular ski) and found that it got very nervous (shaky and uncontrollable), you’ve experienced the bad part of ski flex.
As a rule, softer skis turn easier, but “get nervous” as speed increases. Stiffer skis need to be going faster to turn them but are more “stable” at higher speeds.
Physics plays a big part in ski engineering- Ski production has come a long way since the 220cm, ski-shaped pieces of wood that existed before the Head Standard.
Ski Length – Skis are measured using several different methods. Ski length is widely misunderstood, as it is assumed that when a ski is marked at being "175", it means that when you put the tail of a ski on the floor, then stand it up vertically, that ski measures 175 cm in a straight line from the tip of the ski to the floor.
However, if you go to a ski shop and stand up 5 different model skis next to each other, the odds of those skis not being the same height off the floor are pretty good.
Let's examine how skis are measured and touch on why skis are measured that way.
-CHORD LENGTH is the length of the ski when you measure it from the very end of the tail to the tip, keeping the tape measure taught.
Another way to measure that is to turn that ski over such that the topsheet of that ski is facing downwards on a table, mark where the ski touches the table at the tip and the tail, then measure between the two marks.
In engineering parlance, it's the straight line distance between two points within a circle.
(It's especially relevant when talking about the length of an airfoil or hydrofoil.)
Chord length may come into play in ski measurement when determining the balance point of a ski. For example, "The balance point of that cross country ski is 1CM forward of Chord Center"
The balance point of cross country skis is very relevant since the heel is not attached to the ski. The balance point also comes into play on all alpine skis - especially when talking about twin tips and skis used for backcounty touring.
-SKI HEIGHT-If you stand a ski up perpendicular to the ground, and then dangle a plumb bob from the tip to the floor, that is the HEIGHT of that ski.
Some skis are not measured using either of those methods.
-For example, some generations of The Elan Ripstick, which is marked as being 188cm, aren't 188 cm tall. If you stand that ski up, perpendicular to the ground, it is 184cm tall. Many people will feel like that ski “ski’s short”- well, that’s probably because it’s 184cm tall but marked as being a 188cm ski. The 188cm length is determined by setting that ski on a table, tip/top sheet facing upward off the table, then placing a tailor’s soft tape measure at the tip of the ski, allowing that tape to lay against the top sheet of the ski, then getting the measurement from the tip to the tail. That’s the
MATERIAL LENGTH of the ski.
In other words, if the tip wasn’t bent up, just laid flat on the table, and measured end-to-end, that’s the material length.
-RUNNING LENGTH is the length of a ski when placed on a table, top sheet facing up, then measuring the distance between the two points where the ski makes contact with the table. It’s also measured by putting the bases of a pair of skis together without squeezing the camber out of them, and then measuring the distance between the two contact points.
EFFECTIVE EDGE is the length of ski edge in contact with the snow while it's being skied. This is the most relevant measurement of a ski, in terms of its performance.
Effective edge can be situational (varying)- In other words, a ski may have tip and tail rocker, so when you're sliding over groomed snow and the ski base is flat on the snow, the effective edge will not include the rockered parts of the ski when they are not in contact with the snow. However, if you roll that ski on edge, and it flexes enough that the rockered sections make contact with the snow, or the snow is deep enough such that the ski is submerged enough that more of the ski is in contact with the snow, the effective edge becomes longer.
Which method of measuring ski length is most important to you?
-Most people stand a ski up next to themselves and make a judgement on length depending on how tall the ski is in relation to them (ski height). As you may now have begun to realize, ski height may not be as relevant as you originally thought. When all is said and done, you can always default to the length that’s
marked on the ski as that is the closest approximation to how long the ski will feel to most skiers. If you have questions specific to a ski's performance, go into your local ski shop and have a conversation with the staff. They will likely have either skied the ski, or received training from a manufacturer's rep. related to it's construction and performance.
Just to complicate things a bit, here are some other points to consider-
Skis can vary in length, in
sections. Some skis have "extended tips" (and/or tails); in other words, the material length of the tip of a race ski may be 5cm, but the tip on a powder ski may have a material length of 15cm. That adds overall length to the ski, but it only becomes relevant if/when that part of the ski is in contact with the snow, or it's weight affects performance of the ski.
-Why have extended tips?
They add length to the ski for skiing in deeper snow. Extended tips, most often, are rockered such that they don't touch the surface the ski is laying on when that surface is firm and flat. That part of the ski becomes less relevant on groomed trails (except when considering swing weight).
Why build skis like that?
Longer skis are generally desirable to enable float in deeper, softer snow. When that ski becomes submerged enough to engage the rockered sections/extended tip with the snow, that extra surface area helps the ski to not submerge so deeply such that it becomes too difficult to effectively turn. It also allows the ability to smear for speed control/direction changes. Having an extended tip allows a ski to ski “shorter”, vis-à-vis easier, on hardpack, and float better in deep snow. That can add to the versatility of the ski.
-Conversely, shorter ski tips play a role in ski performance, as well. Shorter tips reduce weight and have better aerodynamics than longer tips. They may also be a better foundation for adding slalom race tips to that ski.
-In some cases, when a ski has a shorter tip, it may also have a comparatively longer running length. Some manufacturers refer to this as a “forward contact point”.
In other words, that ski may be marked as a 179cm ski, but has the running length of a 182cm ski. This makes the EFFECTIVE EDGE of the ski a little longer, and, assuming that the turning radius of that ski is the same as another ski that is marked the same length, then the real difference becomes improved edge grip and stability at speed, because longer effective edge means more edge contact. Generally, the target market for that ski is someone who’s looking for that particular turning radius on a ski and wants to go fast. The targeted demographic for skiers who want or prefer shorter tips, are generally skiers who want to go faster and have the ski remain stable.
Smear or smearing–The smear is a controlled skid, used to scrub/reduce speed or make quick direction changes. It’s one of many tactics a skier can use to affect control while skiing.
-Often performed by shifting weight over one's skis such that the tail of the ski loses grip and slides towards being perpendicular to the slope of the hill. This brings on speed loss and/or direction change.
Stance–Stance is the position a skier uses when standing on their ski. Stance can refer to position of the foot, fore and aft on the ski, how upright or squatted someone stands, balance position (for example, standing over your forefoot, arch, or heel), or anything that refers to the position of the body over a ski.
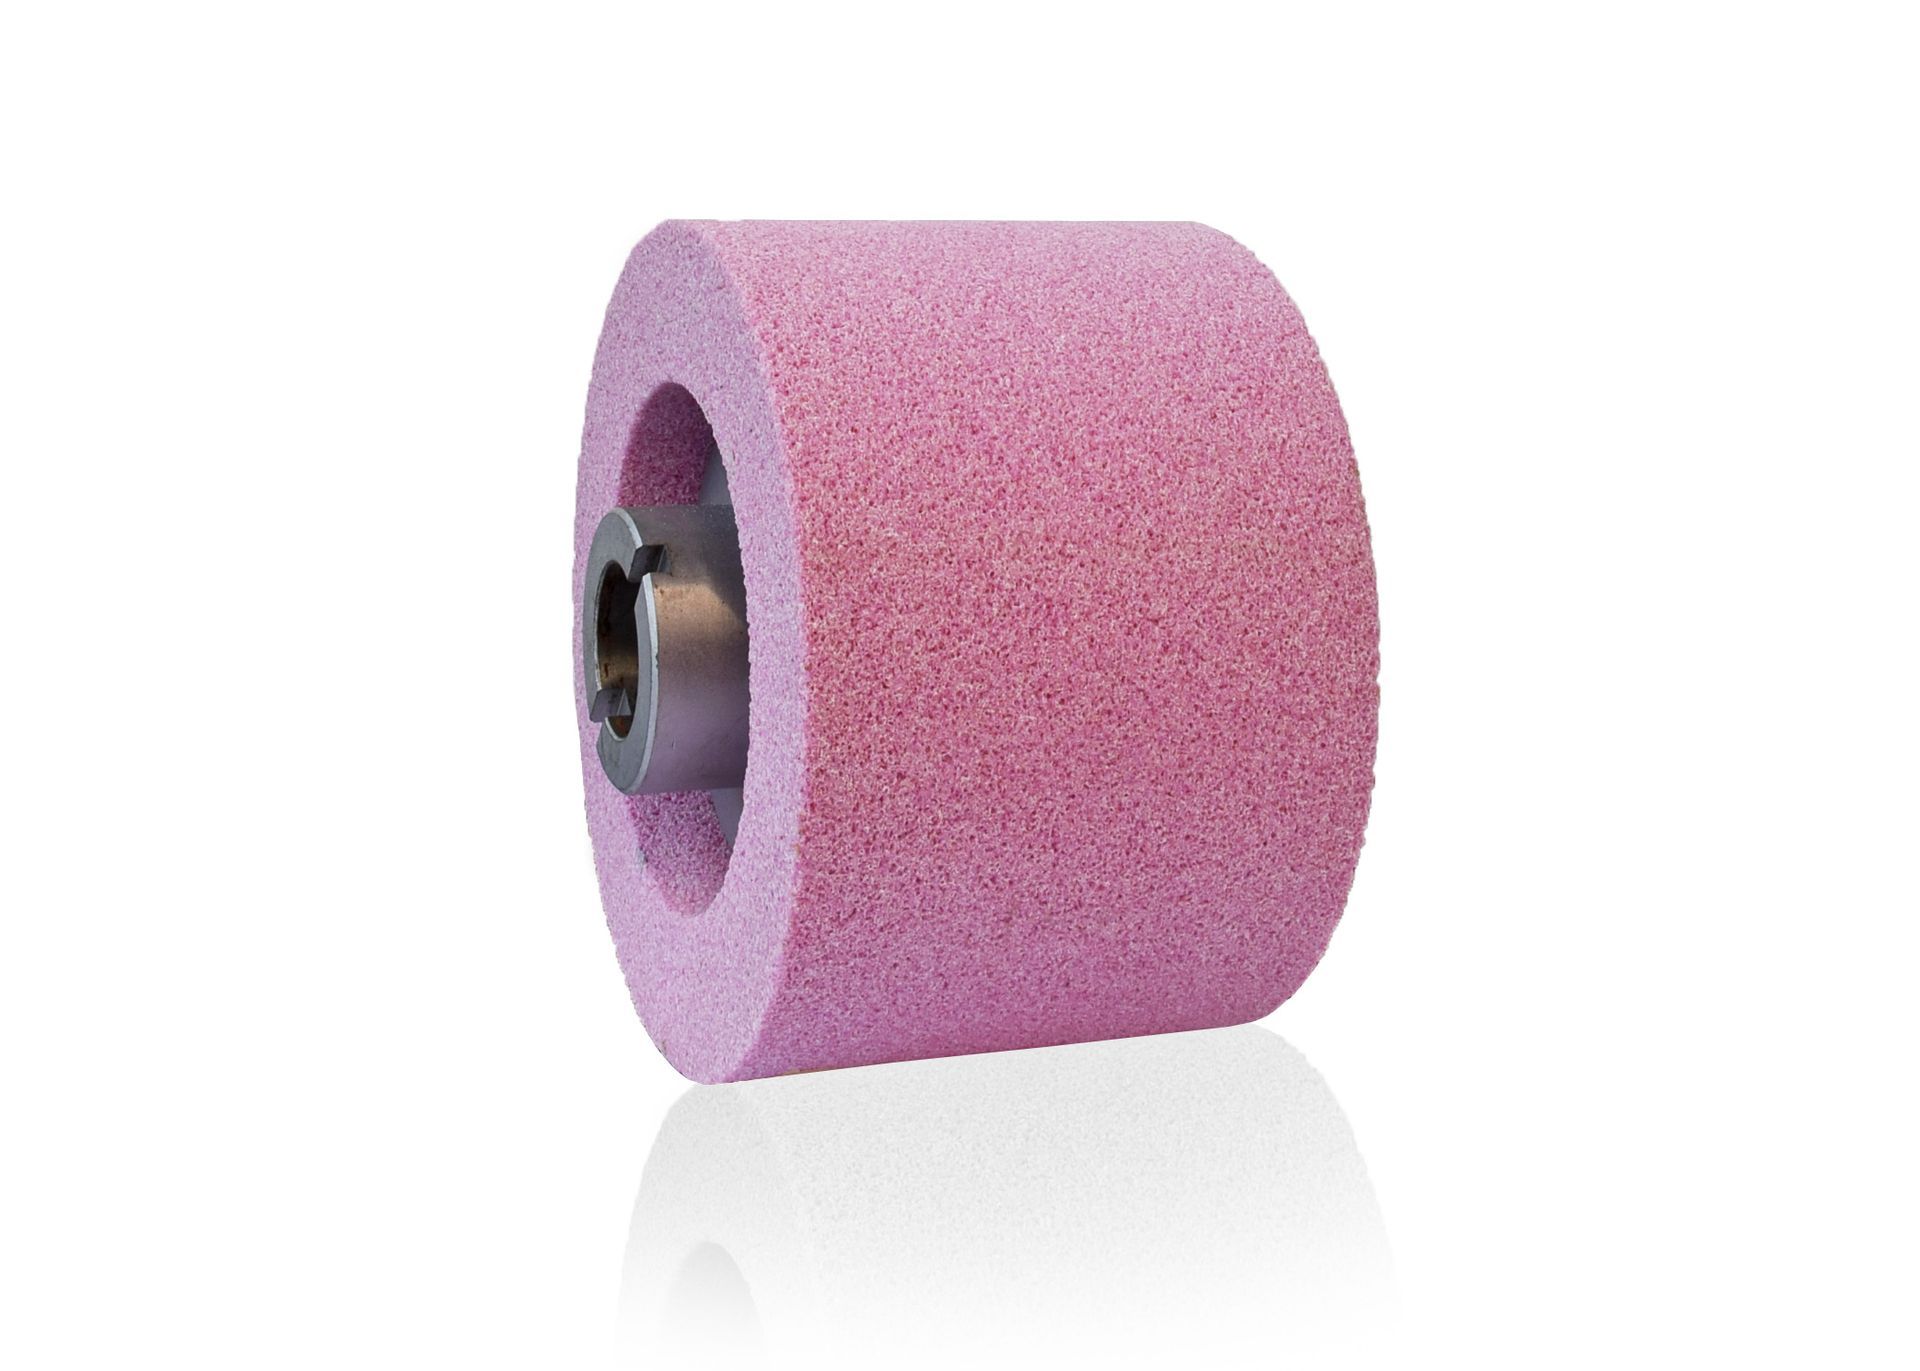
Pink Stone For a Ski Tuning Machine (narrow width):
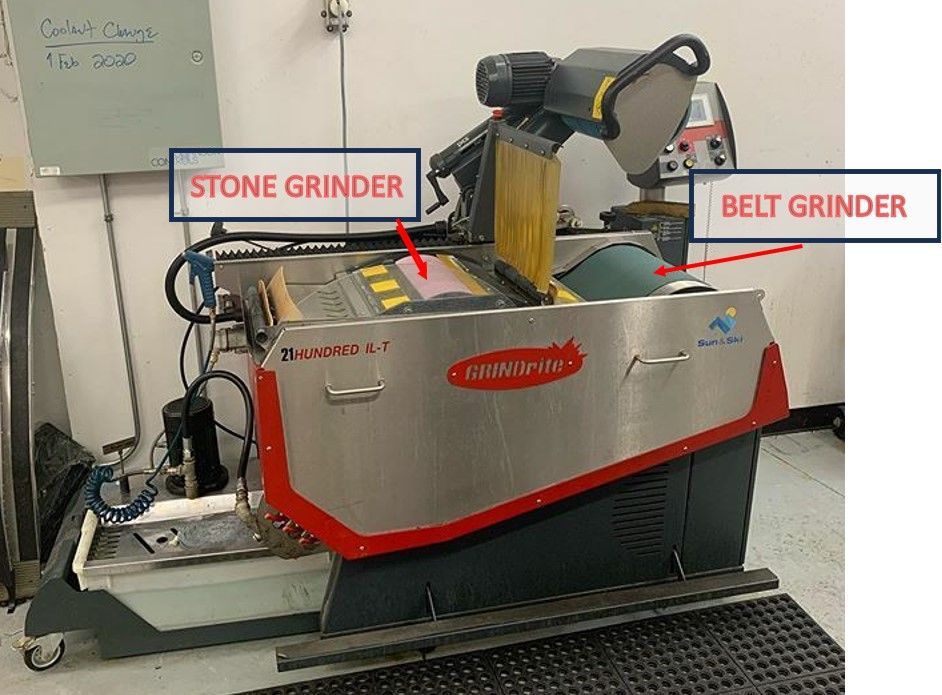
Multi-Purpose Ski Tuning Machine (with belt and stone, compatible with snowboard and ski):
Stone Grind - stone grinding when associated with ski maintenance, is where the ski is passed over a spinning ceramic stone, of various textures (generally pink/soft vs blue/hard), where doing so flattens the base and applies a texture to the base. The type of texture is determined by how the stone is “dressed”, where a fine diamond is passed over the entire width of the spinning stone, at various widths and depths, to affect the pattern cut into the stone, which affects the pattern cut into the ski base.
Picture an old fashioned honing wheel, that used to sharpen axes, swords and other implements- The ski stone grinder is a similar principle.
A, important note about ski maintenance- There is a fallacy/misunderstanding around stone grinding which purports that having skis stone grind tuned will drastically shorten the life of skis. While a stone grind does remove a miniscule amount of material from the base of your skis, a well done stone grind will remove less material than a belt grind (basically sandpaper belts of various coarseness), and give a better tune than clamping your ski in a vice and base filing it every time you ski. An experienced ski tuner, using a well maintained machine will help lengthen the life of your skis.
It is important to also note that if you don’t have your skis stone grind tuned often enough, the increased base bevel from wear of the base will require that more material be removed to make the ski flat again. In that case, it is irrelevant whether a belt or a stone removes the material, it will require either tool to remove the same amount of material to make the base flat again.
Stone grind tune ups are a little more expensive because replacing a stone costs more than replacing belts, but the quality of tune is significantly better than a belt tune. The best case scenario for a skier is to establish a good relationship with a brick and mortar shop that has highly skilled ski tuners. In that case, a season tune will save you a lot of money over the length of a season.
A knowledgeable person tuning skis will use the minimum amount of pressure related to the ski passing over the stone, and use the correct pattern texture with minimal passes of the skis, to have a best preserve the life and skiability of your skis.
Case in point; I own a ski from 2009 that I run over the stone grinder regularly, using minimal wear profiles, and that ski still has a lot of life (material) left in the base. That ski can, very likely handle another 75-100 stone grinds. A good shop technician will determine what your ski needs, and cause the absolute minimum wear and tear to keep your skis in good shape.
Again, look into a season tune at a good shop- Those are the most “bang for your buck”, and the tuners should do minimal hand touch ups as required, using the stone and belt sparingly. In the end, spending a little more on maintenance will drastically improve your skiing experience and the life of your skis.
Sweet Spot–When I refer to a ski’s sweet spot, I’m referring to a broad range of things that relate to what makes a ski perform best as determined by where the foot is positioned on a ski, and the balance point over the foot.
A ski's sweet spot dictates how much pressure is required by the foot (or different parts of the foot) to make a ski turn or remain stable, the skier's stance, etc., all as they relate to a specific position of the body over the ski and the performance of that ski.
Ski manufacturers, generally, mark skis in the middle of the sweet spot, in the place where the midsole of the ski boot should be mounted on the ski (commonly referred to as the “center mark”). Some skis will have multiple center marks, which allow the skier to choose different types of performance (a variable sweet spot). There are a few skis which use a mark to designate where the toe of the boot should be placed, but these construction types are becoming quite rare, and have a particularly small (difficult to use) sweet spot.
I will refer to a sweet spot’s size, type, location on a ski, or it’s general characteristics, as it relates to a skiers experience and level of athleticism.
Vibration (See Ski Flex for more detail)–In ski parlance, vibration generally refers to undesirable situations where edge contact and user control of skis are adversely affected by resonating motion through skis. As vibration amplifies (usually as the speed of the ski(s) over the snow increases) control over the ski(s) decreases.
Wax–Originally paraffin based, “wax” now colloquially refers to any chemical applied substance which affects ski glide. Wax may contain fluorination (which is being phased out due to environmental concerns) for improved/faster glide. Other materials in the mix are carbon, hydrocarbons (along with fluorinated hydrocarbons), surfactants, pigments, metal powders, solvents and graphite.
- For more information on Fluorination, search the web for “PFAS”, “forever chemicals”, “fluorinated ski waxes outlawed”).
Waxes of different hardness and chemical composition allow a ski base to glide more effectively (with less friction) in different snow types and temperatures. Wax and tuning technicians will match the appropriate wax compounds to the base material and ski conditions to allow skiers to have the best possible ski experience while limiting wear and damage to ski bases.
Wax, most commonly, will be rubbed on, or applied with heat.
Applying wax with heat "impregnates" the base with wax (a condition where wax is absorbed into the base of the ski-especially with larger-pored, sintered bases).
Heated application methods most commonly include "hot boxing" (placing a ski, base down, in a melted pool of wax, in a temperature controlled box for a significant period of time), application with an iron, or by using infrared application tools. The longer the base can remain heated to the proper temperature, the better the wax absorption.
Too much heat is undesirable as it can delaminate the ski and/or cause undesirable changes to the properties of the wax and base of the ski.
Not enough heat means not enough wax absorption, such that the wax does not last long on the base of the skis.
Ski waxing is a science unto itself. Using wax which is most compatible with ski conditions (snow and ambient temperature, base material, the expected speed of the skis, the type of snow crystal, relative humidity and the water content of the snow, etc.) all apply in the science of ski waxing.
In the world of competitive skiing, wax composition is a closely guarded secret, as races are often decided by thousandths of a second. All things being equal, wax composition and application WILL make the difference between a podium finish (finishing 1st, 2nd, or 3rd) or not.
Wax, on the base of a ski, performs best when it's absorbed into the base where a very thin (often microscopic) layer remains. That layer must be brushed to remove excess, which interferes with the tuned structure of the base (this affects glide characteristics).
Leaving too much wax is detrimental to glide because it does not provide for for water being channeled away (snow/ice melts for an instant, due to the friction of the ski).
Regular waxing of skis is essential to ski maintenance and preserving the life of your skis. It is, perhaps, the most important part of ski maintenance as it requires being done most often.
Modern Ski wax ix quite different from bees wax, candle wax, etc., and those substances should not be applied to modern polyethylene ski bases.
Compounds that include solvent and/or oils (WD 40, 3 in 1 oil, etc.) should NEVER be applied to a ski base, with the risk of degrading the base and dissolving glues, etc., incorporated in ski construction.
Ski wax manufacturers include (but are not limited to Swix, Toko, Purl, Wend, Briko Maplus, Holmenkol, Hertel, Solda, SVST, and a host of others.
Most wax packaging will include direction for the proper application temperature- these instructions should be strictly and carefully adhered to.
Lastly, it's important to understand that cross country ski wax is often different from alpine ski wax. Cross country skiers will use waxes for different types of cross country skiing (kick vs skate, etc.), including climbing- where a sticky wax is used (e.g. klister) to allow uphill climbing without sliding back in the direction from which you came.
Most everyday skiers can use a universal alpine ski wax, for the most part of the ski season. Universal waxes have improved in performance and endurance over the years, and are more than adequate for ski protection and glide.
Swing Weight–This generally refers to weight in the tip and/or tail of a ski. A ski that has a lot of swing weight would feel like an end-loaded baseball bat; slower to maneuver, and generally heavy.
Titanal – You may hear this word pronounced multiple ways; but the most common pronunciations are TEET-un-all and TYE-tan-ull. Suffice it to say that it’s an alloy of metal; generally a blend of titanium and aluminum, which is used in the construction of skis as a layer, multiple layers, or segments of various size and shape.
It’s also used to reinforce different sections of a ski. For example; under foot to reinforce where the binding screws into the ski, or at the tip and tail to reinforce those areas of the ski and control vibration. Manufacturers may sometimes perforate, slice, or use shaped pieces of this material to tune out vibration and/or control flex.
-Characteristics of Titanal: are vibration dampening and overall stiffening of a ski. While titanal improves/increases performance of a ski, it adds some weight.
Titanal is a very versatile material; and has different effects upon performance depending upon how thick the metal layers are, and how many layers there are. Manufacturers can tune the performance of a ski to very precise specifications, using this material.
Titanal, truly is a miracle material, when used properly, in the construction of skis.
Top Sheet
–This is the upper most production layer of a ski. It's the top surface of a ski, where you can see the graphics design of that ski. The top sheet may or may not have a major effect upon ski performance- Some vibration control devices are added ot the top sheet of a ski. SKi bindings are sometimes screwed down to the top sheet of a ski. Other times, the bindings are installed in a track which is screwed to the surface of a ski.
Torsion Box–This is a method of construction where vertical layers of material are added to a laminated core, to resemble a box, when looking at a cross section of the core. Many manufacturers refer to a fiberglass sock, shrunken tightly around a ski core (of any material), to be a torsion box.
Tune or Tune Up–The term “Tune”, has multiple meanings; it can mean the overall design of something, like a ski, in reference to design characteristics, vis-a-vis performance or “personality”. For example, the flex pattern of XYZ ski is tuned to make it more fun in the park, than on steep, icy, groomed trails”
Tune” or “Tune up” also refers to the maintenance or design specifics of a ski as it pertains to flatness and texture of the base, edge sharpening/edge bevel angles, wax and waxing specifics, base and edge repair, and some minor or cosmetic repairs to the top of a ski. See “Side edging”, “Stone Grind”, “Belt Grind”, “Hand finish”, “Base Texture, Sidewall”, “Base” and “Core Shot” for more information.
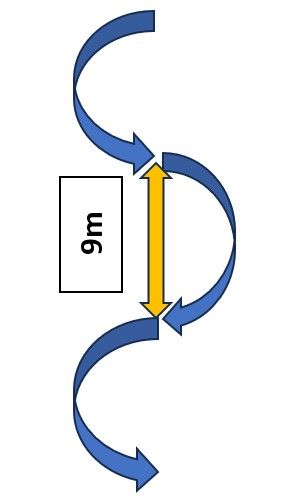
Turning Radius–The word “radius”, is a bit of a misnomer. We all remember what the radius of a circle is, right? The radius of a circle is the distance from the center to the edge of a circle. However, when talking about turning radius, it is the distance from the beginning of one turn to the beginning of the next.
We may remember that “turning radius” is a term associated with what it takes for a car to change direction 180, with the wheel turned as far as it will go. Ski turning radius is the same idea.
In skiing parlance, the turning radius of a ski is the turn size that represents the optimum turn size for the length, and sidecut of that ski, in a carved turn.
The basic formula for that (in case you are interested) is: R=C2/SC).
Where R the turning radius
C2 is the length of the ski in contact with the snow, squared.
SC is the side cut
Note: The FIS formula is a bit more complicated, but it is, essentially, the same idea. You can find that here:
https://member.fis-ski.com/skicalc_info.htm
Most modern slalom skis, which are available to the public, range from a 9 to 12-meter turn radius. Therefore, I generally reference 9-12 meter radii skis as short turn skis.
Most all-mountain and carving skis fall under the medium radius category, with turn radii of 13 to 17 meters.
Big mountain skis and GS skis are generally, 18 to 22 meters.
In some cases, especially world cup GS skis, that radius may be bigger. So, for the purposes of generalizing when discussing skis:
9 - 12 meters: Short turn radius
13 - 17 meters: Medium turn radius
18 - 22 meters: Long turn radius
EXAMPLE:
The figure to the right represents a 9m turning radius, for a ski making 3 turns (left, right, left).
OVERVIEW
CONTACT
E-mail: soulofskiing@gmail.com
